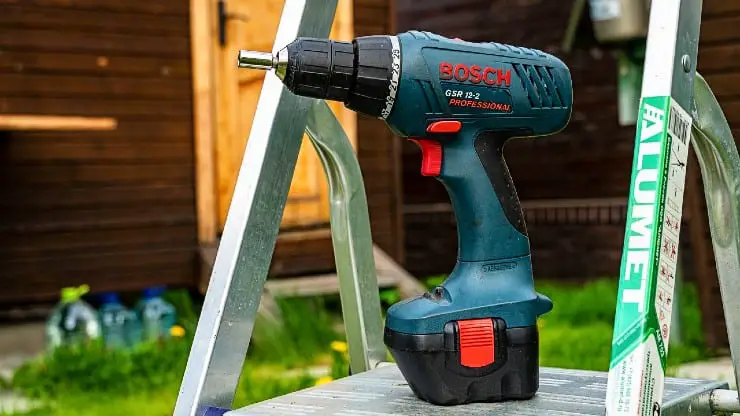
Hi there! I’m Woodworking Street, and in this post I’ll be talking about drill drivers—what they are and how you can use them to help with your projects.
So, what IS a drill driver:
A drill driver is a type of power tool that combines the functions of a drill and a screwdriver. You can use it to make holes and also drive fasteners such as screws and bolts. The typical drill driver has a variable speed trigger, has a speed selector control, is reversible, and has a clutch mechanism that lets you adjust torque when driving screws.
However, this is not the entire story. If you would like to learn more about this subject and gain additional insight into its complexities, please read on.
Table of Contents
- The variable speed trigger of a drill driver
- The reverse control of a drill driver
- The clutch of a drill driver
- The speed control of a drill driver
- How to Install and Remove Bits on a Drill Driver
- What can you do with a drill driver?
- Final words …
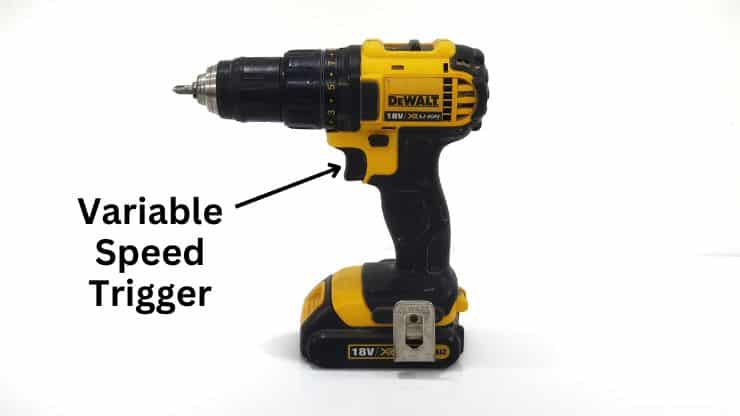
The variable speed trigger of a drill driver
The variable speed trigger is a great feature that makes your drill easier to use. By adjusting the pressure you put on your finger against the trigger, you can change the speed at which your drill rotates. This is useful for drilling holes through different materials and helps maintain accuracy, by not forcing you to run the tool at full speed as soon as you turn it on. To find out more, read an article I wrote about the variable speed trigger of a drill driver.
Variable speed triggers also make these tools more flexible and able to handle more situations. A few examples will illustrate what I mean:
Making a hole
The variable speed trigger allows you to control the speed of the drill driver. The speed of a drill driver is measured in RPM, or revolutions per minute. Drill drivers usually have another speed control, known as a “speed selector,” along with the trigger. This control allows you to set the maximum speed for the drill.
When you’re using a drill to make holes, the speed at which your drill spins is extremely important. You can use it to create a hole that is perfectly aligned with other parts of your project. Accurate measurement is crucial for success, especially when the rotation speed is high. If the bit jitters or jumps around in a hole–or worse comes out altogether and ruins everything!–it can be very frustrating.
Using a screwdriver bit
A drill driver is one of the most useful power tools you can get for your shop. It’s capable of driving wood screws, lag screws, and almost any other kind of fastener.
When driving screws, most people prefer a slower speed because it helps them control where the screw goes and how deep it gets driven into the wood.
Using a nut driver drill bit
A nut driver bit can be used to help tighten and unscrew nuts and other fasteners. It’s ideal for both home improvement projects and do-it-yourself enthusiasts.
When using a nut driver bit for your drill, it’s important to keep control over the tool so you don’t tighten bolts too much. A variable speed trigger allows you to select an appropriate speed setting for whatever job is at hand.
Paint stirrer or other attachments
Some attachments for the drill driver require that you have control over the speed, such as the paint stirrer. If the drill driver spins too rapidly, the paint can splatter and make a mess!
Some manufacturers advise against the continuous use of a trigger switch in a variable speed range. For example, the Dewalt Power Tools company includes the following message in the owners manual for some drill drivers:
“… continuous use in variable speed range is not recommended. It may damage the switch and should be avoided …”
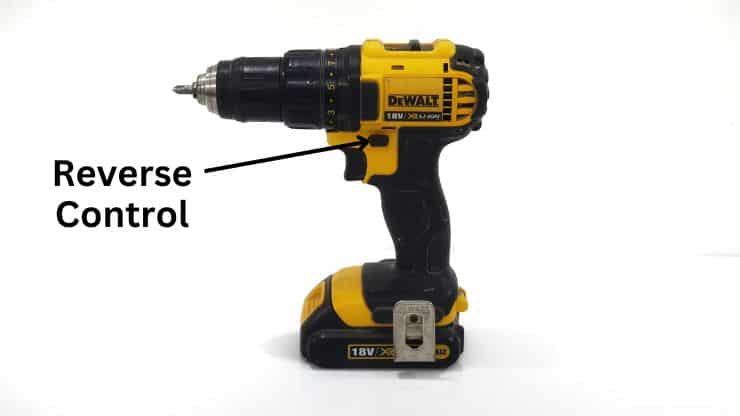
The reverse control of a drill driver
The reverse control on a drill driver is a lever or button used to change the direction of rotation from forward to reverse. This can be useful for removing screws, removing the bit from the workpiece, and using left-handed bits to remove broken bolts. The reverse switch is usually located near the fingers of the hand. This allows easy access to the control without removing one’s hand from the tool grip.
While this may seem like a small or insignificant feature, it can actually help you get more done in your projects.
Here are some reasons why you would want the drill driver to go into reverse:
Remove screws – If you want to remove a screw, you can use the reverse feature on your drill driver. This will allow you to back out of the hole and easily extract it.
Remove bolts or other fasteners – Another reason is to remove bolts or other fasteners. The same principle applies here as with removing screws. You can easily remove the bolt or other fastener without damaging it or causing damage to surrounding surfaces or materials.
Extract the drill driver bit from a material – You can also use this feature if you find yourself in a situation where you need to extract a drill driver bit from a material (e.g., wood). You can easily remove the bit so that you can move on with your project!
Remove a bolt with a broken head – It’s not unusual to break off a bolt head while you’re trying to remove it. You could try prying it out with a screwdriver, but that’s likely to damage the surrounding surfaces. Instead, use your drill’s reverse function. This way you’ll avoid damage and save time as well! Here are the steps:
1) First, select the reverse direction on your drill driver.
2) Put a left-handed drill driver bit into the chuck. This is a bit that is made to cut the material when it spins in reverse (counterclockwise).
3) Put the tip of your drill driver bit into the center of the hole where the broken bolt is located.
4) Start drilling until the broken bolt comes out!
To find out more, read an article I wrote about the reverse control of a drill driver.
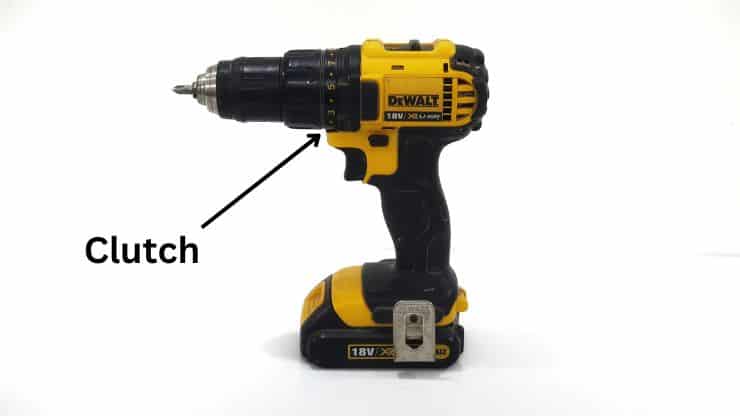
The clutch of a drill driver
The drill driver clutch allows you to control the amount of torque exerted by your drill driver. While most people know what a drill is, they may not be as familiar with the term “torque.”
Torque can be thought of as a “rotational force” or “twisting ability”. Drills that develop more torque can drive longer screws or handle harder materials.
It is helpful to be able to control the amount of torque you apply when driving a screw for many reasons, including these:
So you don’t overtighten the screw – When you’re using a drill driver, you don’t want to overtighten the screw. In fact, it’s actually possible to drive the head of the screw below the surface of the wood when you use too much force. This can cause the wood to splinter or crack!
So that you don’t break off the head – A drill driver is a tool that can be used to tighten screws, but it also has a clutch, which means that it will stop tightening the screw when it reaches a certain torque. This prevents you from overtightening and breaking off the head.
So that you don’t chew up the head – If you don’t have a clutch on your drill driver, it could chew up the head of the screw and render it useless. That’s one thing that can ruin your day!
So that you don’t damage hardware – Drill drivers are often used for attaching hardware to work surfaces; for example, cabinet latches to cabinet doors. If the drill provides too much torque, you can break the cabinet latch and damage your cabinets. A clutch on a drill driver reduces the chance of overtightening screws and damaging hardware by stopping the bit once it reaches its torque setting.
What is the collar with numbers on it?
When you’re using a drill driver, you’ll notice a collar with numbers on it near the chuck. You rotate the collar in order to make a torque setting. The higher the number, the more torque will be delivered to your screw.
For softer materials, such as drywall, use a lower setting for the collar. For harder surfaces or longer screws, set it to a higher number.
What if you hear a clicking noise?
If you’re driving a screw, you may hear a clicking noise. Don’t worry—that’s normal! It just means that the torque required to turn the screw more exceeds the torque setting. To screw it in further, increase the torque setting.
In summary, it doesn’t mean anything is wrong with your drill or that it’s been damaged.
A drill driver is a tool that can be used for many purposes, from installing doorbells to creating beds. It’s versatile and useful, so make sure you know how to use it correctly! To find out more, read an article I wrote about the clutch of a drill driver.
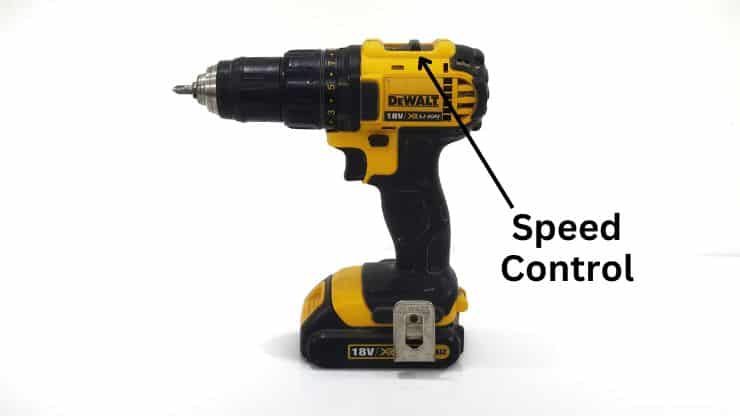
The speed control of a drill driver
When you’re using a drill driver, there are a few important things to know about the speed selector control:
First, the speed selector control allows you to determine the maximum speed of the drill driver. The variable speed trigger can be used to vary the speed from 0 RPM to the maximum chosen by the selector.
Second, this variable speed control is useful for driving screws and drilling holes in various materials. The lower speeds are used for driving screws and the higher speeds can be better for drilling holes.
The drill driver’s adjustable speeds make it a useful and versatile tool, making it possible to use the same tools for different applications. For example, you can use your drill driver to drive screws into wood or plastic, and you can also use it for drilling holes in wood or metal. To find out more, read an article I wrote about the speed selector of the drill driver.
Generally, the speed selector is part of an adjustable gear system. Some manufacturers state the following:
“… Do not change speeds when the tool is running. Always allow the tool to come to a complete stop before changing speed …”
How to Install and Remove Bits on a Drill Driver
There are a lot of things to love about having a drill driver. It’s convenient, it works quickly, and it can help you get the job done in a fraction of the time when compared to other methods. But there’s one thing that can be a bit of an annoyance: changing drill bits.
There are two ways of doing this. First, you can always loosen and tighten the chuck manually. This is certainly possible, but it takes time. And there’s another way that’s much faster: You can use the motor of the drill driver!
Here’s how it works:
To loosen the chuck holding the drill bit
1. Hold the chuck with your hand so that it cannot move
2. Gently and slowly start the drill in reverse (counterclockwise)
3. This will loosen the drill bit!
4. Be careful not to injure yourself by letting the drill move too fast
To tighten the chuck holding the drill bit
1. Hold the chuck with your hand so that it cannot move
2. Gently and slowly start the drill in the forward direction (clockwise)
3. This will tighten the drill bit!
4. Be careful not to injure yourself by letting the drill move too fast
Changing bits is a vital part of the woodworking process. It’s important to know how to remove and install bits on your drill driver so that you can get the most out of your tools and ensure that they continue working at peak performance.
The non-manual process listed above help saves time and makes the chore of changing bits easier.
What can you do with a drill driver?
DIYers and those new to woodworking may be wondering what they can do with a drill driver. In fact, it’s one of the most versatile tools you’ll ever own! Here are just a few ways you can use your drill driver:
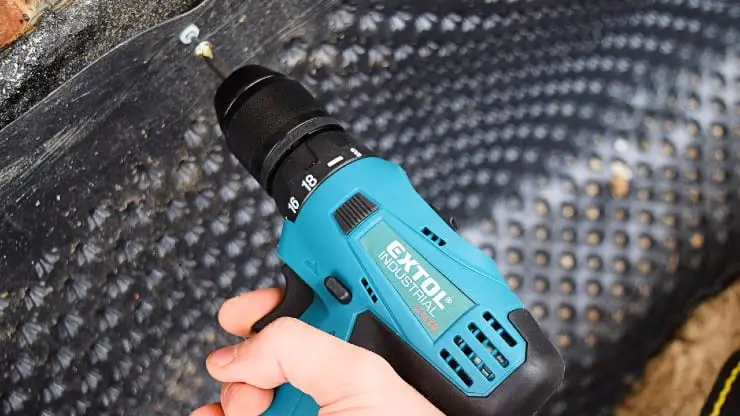
Drill holes
You can use the drill driver to drill holes in many materials such as wood, metal, and plastic. The speed to use depends on many factors including the type of material and hardness of the material. You can use a drill driver to bore through glass, porcelain, and granite by inserting the proper bits into its chuck.
Note: This post may contain affiliate links. If you purchase a product through an affiliate link, I’ll earn a commission, at no cost to you. To find out more, see my full disclosure.
Drive screws
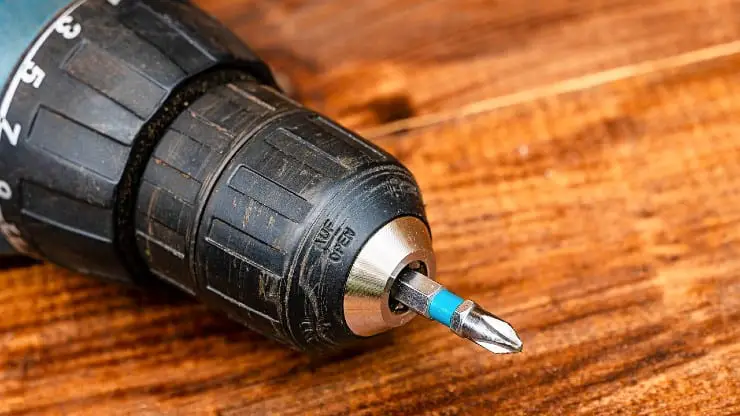
To drive screws, you need the right screwdriver bit. The drill driver can use many types of bits, including these:
Flat blade screwdriver bit – This is the most basic type of screwdriver bit, and it’s used for driving slotted-head screws. It’s great for when you need to drive many screws in a row. See bits like this on Amazon.
Phillips head screwdriver bit – For Phillips head screws, you can use a Phillips head screwdriver bit. Be sure to select the right size—Phillips head bits are available in different sizes and lengths. You might also want to invest in some magnetic tips so that you don’t drop them down into dark spaces or crevices where they can be hard to retrieve later on! Here are some bits like this.
Pozidriv head screwdriver bit –The Pozidriv screwdriver bit is designed for use with Pozidriv screws, which are an improvement over Phillips head screws. Pozidriv screws allow more torque to be used while driving them into place, so they’re a good choice for many applications. See some Pozidriv bits on Amazon.
Attach fasteners
A drill driver can also be used to quickly attach other fasteners. As an example of what I mean, I’ll describe how I used a drill driver when replacing worn weatherstripping on a garage door: The weatherstripping was held in place by self-tapping screws with hexagonal heads. I used a “nut driver” bit in my drill driver. This type of bit allowed me to attach the fasteners quickly and easily. I can’t imagine doing this manually!
Use as a hammer
Some drill drivers have a hammering capability. In the case of drill drivers like this, the internal mechanism produces a percussive force in the direction of the drill bit.
The drill driver isn’t the same as an impact driver. An impact driver is also a type of drill that produces a hammering action—but the hammering action is in the direction of bit rotation, rather than in the direction of the bit.
Assemble furniture
A drill driver is a powered version of the regular old hand-operated screwdriver. It can be very useful when it’s time to put together furniture, because it quickly and easily drives screws into place. There is less of a struggle holding pieces in position.
Mix paint and other substances
The drill driver makes the job of mixing paint easier. All you have to do is put a special bit in it and let the machine take care of everything else. Here is a paint mixing bit on Amazon.
Making rough holes
Sometimes, the hole doesn’t have to be perfect. In fact, it can even be rough. For example, if you’re cutting holes in joists for wires to go through, it doesn’t matter if the edges are splintered or messy—what matters is that there’s a hole there. A spade bit will do the job just fine and is great for making rough holes. The drill driver can be used with a spade bit for this task. Here are some spade bits on Amazon.
Making precise holes
One of the most popular tasks is drilling precise holes for woodworking or cabinetry. But how do you know if a drill driver will give you the precision that your project requires?
The answer is simple: use a Forstner bit! These bits cost more than ordinary bits, but they make cleaner holes that look better in the end. Here is a Forstner bit on Amazon.
Making countersinks
The drill driver can also produce countersink holes, which allow the screw head to travel below the surface of the wood. You can then cover the screw head with a wooden plug so that it is not visible. This is an especially useful technique when building cabinets or furniture frames. See some countersink bits.
Final words …
So there you have it! You’ve learned the basics of what a drill driver is, how to use it, and what types of projects you can use it for.
In summary, the drill driver usually has the following features:
A Clutch mechanism – this allows you to adjust the maximum torque that the drill driver will provide when turning a screw. It can help prevent driving the screw too far or damaging the screw, workpiece, or piece of hardware you are fastening.
A reverse control – You are able to run the drill either forward (clockwise) or in reverse (counter-clockwise). This lets you remove screws and makes the tool more versatile.
A variable speed trigger – This feature lets you vary the speed of the tool by pressing down on the trigger. It lets you start at a slow speed to avoid having the bit “jump around” out of place.
A speed selector control – while the variable speed trigger allows you to make fine adjustments to the speed, the speed selector control sets the speed range and determines the maximum speed the drill driver will reach.
If you want to know more about the features related to drill drivers, the following posts will provide additional information:
- What Is A Drill Driver Clutch?
- What Is A Drill Driver Reverse Control?
- What Is A Drill Driver Speed Selector?
- What Is A Drill Driver Variable Speed Trigger?
Thanks for reading!
Did you enjoy reading this article? If so, you might like my Pinterest profile. It contains pins about DIY & Crafts, Woodworking, Tools, Hardware, and many more topics!

Fantastic site. A lot of helpful info here. I’m sending it to some buddies and additionally sharing in Delicious. And naturally, thanks for your effort!
Thank you so much for your kind words and support! I’m thrilled to hear that you found the information on our woodworking blog, particularly the “What is a Drill Driver?” article, helpful and informative. It’s great to know that you’re sharing the content with your buddies and on social media. Your encouragement means a lot and motivates me to continue working hard on providing valuable tips and insights for the woodworking community. If you have any questions or suggestions for future topics, please don’t hesitate to let me know. Thanks again for your comment and happy woodworking!
This website is a beacon of intellectual inspiration, guiding us towards a deeper understanding of the world and ourselves. The administrator’s ability to curate such an exceptional collection of content is a testament to their passion for knowledge and their unwavering commitment to providing valuable insights. Each post is meticulously crafted, weaving together research, personal experiences, and profound insights to create a captivating narrative. It is evident that the administrator possesses a deep understanding of the subject matter and a unique ability to distill complex concepts into accessible and engaging prose. This website has become my trusted companion on my quest for personal growth and enlightenment.
I want to express my sincere gratitude for your glowing and insightful commentary on our website and content. I’m humbled and delighted to hear that you find our articles informative, engaging and useful for your personal growth and learning journey.
Your words truly encapsulate what we strive to achieve here at https://www.woodworkingstreet.com – making complex woodworking topics accessible and interesting while fostering a community of shared knowledge and experience.
Knowing that our content serves as a ‘trusted companion’ in your quest for enlightenment prompts us to work even harder to maintain the quality and depth of the information we curate.
Please continue to explore our articles and don’t hesitate to share your thoughts, questions or suggestions for future topics. Each reader’s engagement brings invaluable enrichment to our shared woodworking community.
Again, thank you for your affirming words.
You’re so awesome! I don’t believe I have read a single thing like that before. So great to find someone with some original thoughts on this topic. Really.. thank you for starting this up. This website is something that is needed on the internet, someone with a little originality!
Wow, thank you so much for your glowing feedback! It truly means the world to us at Woodworking Street to hear such high praise for our work.
We strive to fill a unique gap and provide original, informative, and engaging content on topics that are not typically found elsewhere. Your comment reinforces and reinvigorates our mission!
Your appreciation is a powerful motivator for us and further drives our commitment to keep producing and sharing distinct pieces of content with our readers.
We truly value your support and are excited to continue providing more unique insights. If there’s a specific topic or question you’d like us to explore, please don’t hesitate to let us know.
Once again, thank you for your thoughtful and encouraging words.
I wanted to take a moment to thank you for this well-researched and informative post. It’s evident that you’ve put a lot of effort into providing accurate and helpful content. Your work is greatly appreciated!
Thank you so much for your heartfelt appreciation of our work! It’s incredibly gratifying to know that our dedication to providing accurate, helpful, and well-researched content has been acknowledged and valued by our readers.
At Woodworking Street, our mission is to empower our community with useful and engaging content, and your positive feedback serves as both motivation and confirmation that we are succeeding in that mission.
We truly appreciate your support and will continue to work tirelessly to deliver even more informative and valuable posts for our readers. If you have any suggestions for topics or questions on existing articles, please don’t hesitate to reach out. Your input helps us to keep improving and tailoring our content to your interests and needs.
Thank you once again for your kind words!
I am truly thankful to the owner of this web site who has shared this fantastic piece of writing at at this place.
Thank you so much for your kind words and appreciation of our work at Woodworking Street! I am delighted to know that you find our article on “What is a Drill Driver” both informative and valuable.
Our primary goal is to provide useful and engaging content for our readers to expand their woodworking knowledge and to create a platform for meaningful discussions within the woodworking community.
Your positive feedback encourages us to continue delivering quality content, and we welcome you to continue exploring our website for more insightful articles.
If you have any questions, suggestions, or topics you’d like to see covered in future articles, please don’t hesitate to share your thoughts with us. We truly appreciate your input.
Thank you once again for your support.
Thank you for this helpful post! Your tips and insights have made a positive impact on my understanding of the topic. Keep up the great work!
Thank you for taking the time to share your feedback with us! It brings us great joy to hear that our content has positively influenced your understanding of the topic.
Here at our platform, we strive to provide valuable and comprehensive insights to all of our readers. Our aim is to continue doing so and your acknowledgment of our efforts is genuinely appreciated.
We are continuously working on creating more informative posts which we hope will continue to assist you. Please feel free to reach out with any topics you’d like to see covered in the future.
Once again, thank you for your encouraging words. They serve as great motivation for our team to keep delivering quality content.
Your post is a true gem! It’s packed with useful information, and I appreciate the practical tips you’ve included. Thank you for creating such a valuable resource!
Thank you very much for your kind words and feedback on our “What is a Drill Driver” article. I’m thrilled to hear that you find the information valuable and practical for your woodworking needs.
At Woodworking Street, our mission is to provide our readers with comprehensive, useful, and easy-to-understand content to enhance their woodworking skills and knowledge. Your positive comments serve as motivation for us to continue creating informative and helpful resources for our community.
Please feel free to explore other articles on our website, and don’t hesitate to share your thoughts or suggestions for future topics. Your input helps us tailor our content to match our readers’ interests and needs.
Thank you again for taking the time to express your appreciation.