As a DIYer or woodworking newbie, you’ve probably heard people talking about a “drill driver clutch.” But what is it?
Well, that’s what I’m going to explore in this post.
Let’s get started! So, what IS a drill driver clutch?
A clutch is a device that allows the operator to control the torque used to turn screws and other fasteners. It can be varied from a minimum value to the maximum the drill can produce. This helps you to prevent damaging the screw or workpiece. Also, this helps you to avoid overdriving the screw into the workpiece. The clutch makes the drill driver a more versatile and useful tool.
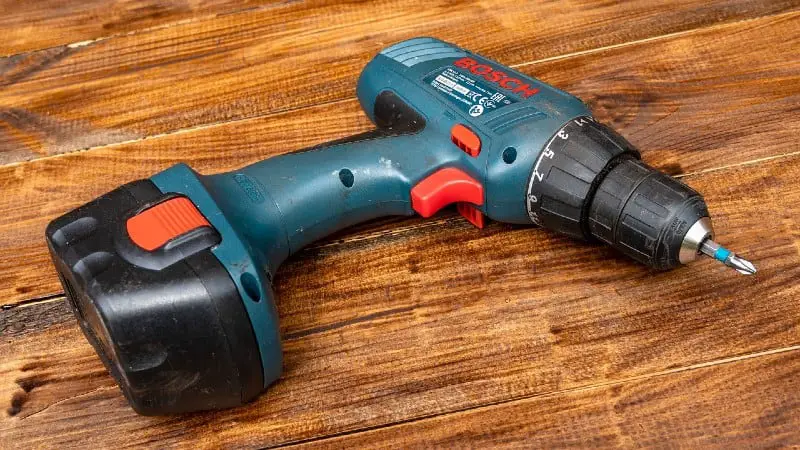
If you’ve ever held a drill in your hand, you’ve probably noticed that there’s a collar with numbers near the chuck. But what do those numbers actually stand for? And how can you use them?
Let’s break it down step by step:
Table of Contents
- The clutch of a drill driver
- Can a drill without a clutch still drive screws?
- Why do I hear a clicking noise when driving a screw?
- Related Questions
- Final words …
The clutch of a drill driver
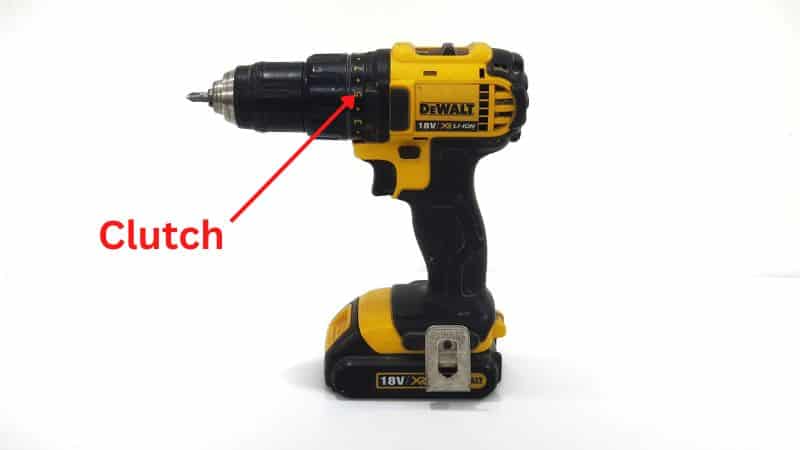
First things first: what is a drill driver? A drill driver is a power tool that allows you to drive screws or bolts into materials such as wood or metal with ease. It’s similar to a regular drill but has some extra features that make it more versatile and easier for DIYers and professionals alike. The most important thing about a drill driver is its clutch system, which controls how much torque is exerted onto whatever material is being worked on by the drill bit.
What is torque?
Torque is “rotational force”. It can be thought of as a “twisting ability”. In the case of a drill driver, this is the force used to turn the screw or drive it into place.
First and foremost, you have to know that drills differ in the maximum torques that they can deliver. The SI unit for torque is the newton meter (Nm). US units for torque are ft-pound and inch-pound.
It can be difficult to compare one drill to another if the listed figures for torque are in different units. Fortunately, it’s easy to convert one unit to another:
1 Nm = .73756 ft-lb
also, 1 Nm = 8.8507 in-lb
The table below shows the torque for several models of drills:
| Tool | Nm | Foot-pounds | Inch-pounds |
|---|---|---|---|
| BLACK+DECKER REVIVA 3.6V Cordless Screwdriver | 5.4 | 4 | 48 |
| BLACK+DECKER REVIVA 12V Cordless Drill Driver | 26 | 19 | 230 |
| Makita FD09R1 12V 3/8″ Drill Driver | 28 | 21 | 250 |
| Bosch 12V PS31N 3/8″ Drill Driver | 30 | 22 | 265 |
| Milwaukee M12 3/8″ Drill Driver | 31 | 23 | 275 |
| Makita FD07Z 12V Brushless 3/8″ Drill Driver | 32 | 23 | 280 |
| Milwaukee M12 FUEL Installation Drill Driver | 34 | 25 | 300 |
| Bosch 12V GSR12V-300N 3/8″ Brushless Drill Driver | 34 | 25 | 300 |
| Bosch GSR18V-400B12 1/2″ Compact Brushless Drill Driver | 45 | 33 | 400 |
| Bosch GSR18V-190B22 1/2″ Compact Drill Driver | 54 | 40 | 480 |
| Milwaukee M18 Compact Brushless Drill Driver | 56 | 42 | 500 |
| Makita XPH12T 18V Compact Brushless 1/2″ Drill Driver | 60 | 44 | 530 |
| Bosch GSR18V-535 Brushless Compact 1/2″ Drill Driver | 60 | 45 | 535 |
| Makita GFD02Z 40V Compact Brushless 1/2″ Drill Driver | 66 | 49 | 585 |
| Makita XFD03M 18V 1/2″ Drill Driver | 84 | 63 | 750 |
| Bosch GSR18V-755C Brushless 1/2″ Drill Driver | 85 | 63 | 755 |
| Bosch GSR18V-975C Brushless 1/2″ Drill Driver | 110 | 81 | 975 |
| Makita GFD01Z 40V Brushless 1/2″ Drill Driver | 141 | 104 | 1250 |
| Bosch PROFACTOR GSR18V-1330CN 1/2″ Drill Driver | 150 | 111 | 1330 |
| Milwaukee M18 FUEL 1/2″ Drill Driver | 158 | 117 | 1400 |
As you can see, the torque varies greatly from one drill to another.
What is the collar with numbers?
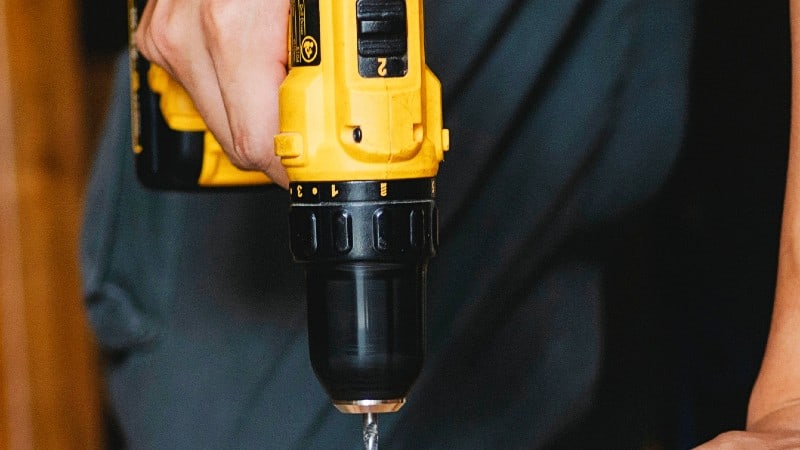
Most drill drivers have a collar with numbers on it near the chuck. These numbers represent how much torque will be delivered to the screw. These numbers can range from 1 to 10 or more with a higher number indicating more torque.
Generally, you set the collar to a lower value for a softer material like drywall and a higher value for a harder material or when you’re driving a longer screw.
How can you damage screws?
Note: This post may contain affiliate links. If you purchase a product through an affiliate link, I’ll earn a commission, at no cost to you. To find out more, see my full disclosure.
There are many ways to damage screws. Here are a few:
Chewing up head – The most common way to damage screws is when the bit slips off of the head of the screw as you’re driving it in. If this happens, it will destroy the head of the screw and make it difficult to continue with your project. This sort of damage is often referred to as a “stripped screw head”.
This can happen if the torque is set too high and the bit continues to turn, even after the screw has completely penetrated a hard surface.
Also, you can have a problem if the bit doesn’t fit into the screw head properly. For instance, a Phillips screw requires a Phillips bit, and a Pozidriv screw needs a Pozidriv bit.
You can remove a screw with a stripped head by first drilling a hole in the center of the head. Then, you can use a left-handed bit with the drill driver in reverse (counterclockwise). I wrote about this in another article.
I don’t want to get off the subject. However, for the sake of completeness, I will mention that there is another way to remove screws with head damage. You can drill a hole in the center of the screw and then use a screw extractor. Here is a set of extractors on Amazon.
Head snaps off – Sometimes, the head of the screw can break off while you’re driving it. If you apply too much torque to a screw and it’s fully driven into an unyielding material, like hardwood or metal, the force can snap the screw’s head off.
It’s sometimes difficult to remove a screw like this. One way to loosen it is by using locking pliers, but if there’s nothing for the pliers to grab onto, they won’t do any good.
Another approach is to drill a hole in the center of the screw and use either the left-handed bit or extractor method described above.
How can you damage the workpiece?
If you set the torque too high, you could end up cracking or splitting the workpiece.
Also, if the screw is attaching a piece of hardware to the workpiece, you might end up breaking, cracking, or damaging the hardware.
With delicate items such as window latches, cabinet door latches, and porcelain fixtures, you might want to consider using a manual screwdriver for some of the work.
What is meant by “overdriving”?
Usually, this refers to a situation where you drive the screw below the surface of the wood. This can happen if the torque setting is too high, or if you’re drilling in soft materials. This can also cause splitting and other problems.
If you want to screw a head below the surface of your wood, you can cover the hole with a wood plug. Before doing so, however, make sure that you drill a countersinking hole first. I wrote another article about countersinking screws.
How do you use a drill driver clutch?
The easiest way to use a drill driver clutch is to rotate the collar in order to select the torque number.
Also, drilling holes in scrap wood before drilling into your project can ensure that you have the correct level of torque for driving screws without damaging the material.
When many drill drivers are in either drilling mode or hammer mode, the clutch isn’t used. For example, some DeWalt drills have the following in the owner’s manual:
“.. WARNING: When the drill mode adjustment collar is in the drill or hammerdrill positions, the drill will not clutch ..”
The clutch makes drill drivers more versatile
A tool is versatile when it can perform a wide range of tasks. For example, a drill driver with a clutch can be used to drive screws and drill holes in wood. This versatility means that you can use the same tool for different projects:
Drilling holes – If you’re drilling holes in wood or other soft materials, the drill bit will cut through with no problems and the clutch isn’t used throughout the process. You don’t need it for this application.
Driving screws – The most obvious way that a drill driver clutch helps is when you’re driving screws. A drill driver will allow you to adjust the clutch so that it has enough torque to drive in screws easily but not so much that the screw head strips or breaks off. This makes your work much more efficient and accurate!
Driving with other fasteners – Often, you have other kinds of fasteners that require special bits. With the proper clutch setting and an appropriate bit for the job, you can easily drive these items into place.
Drilling with spade bits – To drill a hole, you would choose drilling mode. Drill drivers do not typically use the clutch in this setting—a spade bit works best for rough openings like holes through joists.
Can a drill without a clutch still drive screws?
Yes, a drill can still drive screws without a clutch. However, the drill driver is preferable because you want to be able to control the torque so that you don’t overdrive the screws. One approach is to “pulse” the drill on and off so that the screw does not get driven too far into the wood. Also, It’s a good idea to make sure that the drill has a variable speed control. This will help you make sure that the bit doesn’t spin too fast.
Why do I hear a clicking noise when driving a screw?
This is normal. The torque required to turn the screw further exceeds the torque setting. To screw it in further, increase the torque setting.
In summary, it doesn’t mean anything is wrong with the drill or that it’s been damaged.
Related Questions
These are questions that, while not directly related to the post’s question, add value by answering other queries readers may have.
What is the drill driver clutch setting for drywall?
Drywall is a very brittle and fragile material made of gypsum or a similar material. Because it breaks easily, you don’t want to use too much torque when driving screws. One approach is to start at the lowest setting and then gradually increase it, to make sure that you don’t overdrive the screws.
Do impact drivers have clutch settings?
No, the typical impact driver does not have a clutch. The drill driver and the impact driver are different tools that perform similar functions: They both can drill holes—but there are some differences between them!
Most drill drivers have a clutch and some have a hammer mode. The hammering action is in the direction of the drill bit, and helps when drilling into tough materials like concrete.
The impact driver doesn’t have a clutch and has a hammering motion in the direction of bit rotation. Clutches take up space, so impact drivers are smaller than drill drivers.
Final words …
A drill driver clutch is a mechanism that can save you a lot of time, stress, and headaches when you’re working on your DIY project.
Did you enjoy reading this article? If so, you might want to visit my Pinterest profile. It contains pins about DIY & Crafts, Woodworking, Tools, Projects, Hardware, and many more topics!

I have been browsing online more than three hours today, yet I never found any interesting article like yours. It is pretty worth enough for me. In my view, if all website owners and bloggers made good content as you did, the internet will be a lot more useful than ever before.
Thanks so much for the kind words. I’m happy you liked the article and that it was helpful to you. I’m always working hard to make sure I provide top-quality content, and it’s great to know that what I put out there is useful and interesting.
Thanks again!