What is a Drill Driver Reverse Control? If you’re a DIYer or new to woodworking, you might have heard this term thrown around. It’s not a term you hear every day, but it can be important to your understanding of a drill driver.
But what is it?
The reverse control on a drill driver is a lever or button used to change the direction of rotation from forward to reverse. This can be useful for removing screws, removing the bit from the workpiece, and using left-handed bits to remove broken bolts. The reverse switch is usually located near the fingers of the hand. This allows easy access to the control without removing one’s hand from the tool grip.
This seemingly minor feature can be a big help when it comes to completing tasks.
In this blog, we’ll explore the topic of drill driver reverse controls and what they can do for you. We’ll walk you through why it’s important to have a drill with reverse control and how it can help you in your projects.
Table of Contents
- The reverse control of a drill driver
- Does it matter which direction you drill in?
- Should you drill in reverse?
- Related Questions
- Final words …
The reverse control of a drill driver
The reverse control of a drill driver allows you to spin the chuck in the opposite direction from usual. This can be useful for getting screws out that have been driven too far into the wood.
What do we mean by “opposite direction”?
First of all, the direction will be from the point of view of an operator standing in back of the drill.
So, if you’re looking at a drill from behind, forward rotation is clockwise, and reverse is counterclockwise.
In other words, when a normal drill bit moves in the forward direction, the cutting edges of the bit slice into the wood. When a normal bit moves in reverse, the cutting edges do not dig into the wood, and heat is generated due to friction.
Another way of looking at this is that forward rotation would drive a normal screw into wood. Reverse rotation would back the screw out of the wood.
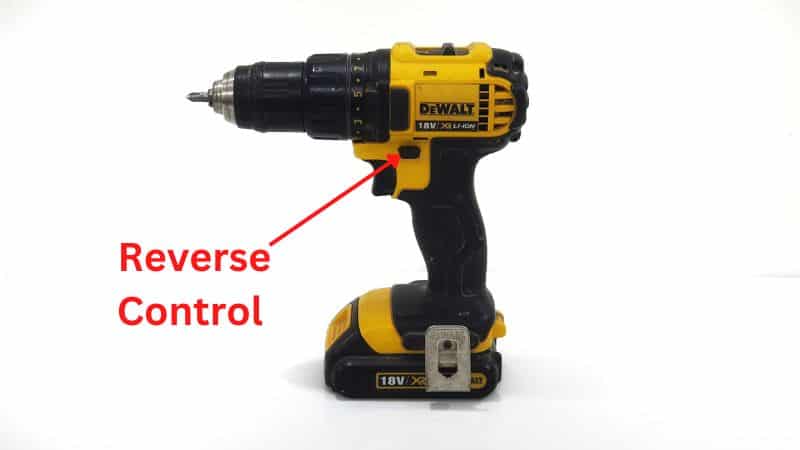
Where is the reverse control?
This is usually near the variable speed trigger. This diagram shows where the reverse control is located on one drill model. You press this button one way to go forward and the other way to go in reverse.
How to use the reverse control
The reverse control is placed in a convenient location near the variable speed trigger and fingers. You don’t need to remove your hand from the drill to reverse the direction. It’s ideal for those who need to change directions frequently and quickly.
You should release the variable speed trigger and allow the drill to come to a complete stop before reversing direction. This is mentioned by Dewalt Tools:
“… WARNING: Always wait until the motor has come to a complete standstill before changing the direction of rotation …”
Milwaukee Tools has a similar warning:
“… The control switch may be set to three positions: forward, reverse and lock … Always allow the motor to come to a complete stop before using the control switch …”
This issue is also handled by Makita Tools:
“… CAUTION: Use the reversing switch only after the tool comes to a complete stop. Changing the direction of rotation before the tool stops may damage the tool …”
Why would you want to go into reverse?
Going into reverse is a great feature of a drill driver. It’s especially useful for those who are new to woodworking and DIYing, but it can also be helpful for more experienced DIYers.
Why would you want to go into reverse? There are several reasons:
Removal of screws – The first reason why you want to be able to go into reverse with a drill driver is that it makes the removal of screws much easier. This will save time and prevent damage to your workpiece.
Remove nuts – Reverse control is designed to help you remove nuts. If you have ever had trouble with a nut that won’t budge, then you know how frustrating it can be when your tool just doesn’t seem able to get the job done. That’s where reverse control comes in!
Reverse control allows the user to apply force in the opposite direction from what they would normally expect from their tool—so if your drill normally goes forward (clockwise), reverse control will go in reverse (counter-clockwise). This can be especially helpful when removing stubborn nuts from their place on a piece of hardware or similar object.
Makes it easier to extract drill – In some cases, it may be necessary to remove a drill bit from a hole. This can be done by going into reverse, allowing the user to easily extract the drill bit without damaging any surrounding materials.
Removal of a bolt – Sometimes, when you’re working on a project and try to remove a bolt, the head breaks off. You can’t just take it out—you need a way to get that broken bolt out of there.
If you have a drill driver, you can do this pretty easily:
1. Use the reverse function on your drill driver so that the chuck turns in the opposite direction.
2. Drill into the center of the bolt with a left-handed bit (This is one that cuts the material when it is rotated in the counter-clockwise direction).
3. In some cases, you’ll be able to get the bolt to start turning.
4. Once you’ve drilled into it so that there’s enough space for your wrench or a pair of pliers to fit around the bolt, use it to turn the bolt counter-clockwise until it comes out!
It can make it easy to loosen a bit in the chuck – If you’ve ever been frustrated when trying to loosen a drill bit in the chuck of your drill driver, you should know that there’s a simple solution!
All you need to do is:
1. Hold the chuck with your hand so that it cannot move
2. Gently and slowly start the drill in reverse
3. This will loosen the drill bit!
4. Be careful not to injure yourself by letting the drill move too fast
For DIYers who are just starting out with woodworking projects, having this feature on their drill driver might not seem like much of a deal. After you’ve used it for a while and gotten accustomed to relying on it, reverse control will make your projects much easier.
Does it matter which direction you drill in?
By “direction,” I mean the direction of rotation. Normally, the drill bit only cuts the wood when it rotates in the forward direction. However, you can also have left-handed bits. These are ones that are designed to cut into a material when rotating counterclockwise – they can make holes when the drill driver is moving in reverse.
So, does it matter which way you go? Well, no… not really! But practically speaking? Yes! Because left-handed bits are uncommon and harder to find than standard bits.

Should you drill in reverse?
In an earlier section, we covered some reasons why you might want to use your drill driver in reverse.
The ability to go into reverse makes a drill driver a more versatile tool. However, this leads to the question: Does it hurt the drill to go into reverse?
The manufacturer’s directions I have seen don’t mention that there’s anything wrong with drilling in reverse. It can help you pull the drill bit out of the workpiece. Also, it can help remove screws and other fasteners.
However, If you want to drill a hole in reverse, you should use a left-handed bit. Using any other kind of bit will just cause friction and not produce the desired results—a drilled hole.

Related Questions
What does a reversing drill bit do?
It looks like this question is referring to a left-hand drill bit. As mentioned in an earlier section, a left-handed bit can be used to drill out a bolt when the head has broken off.
This doesn’t always work, you need to make sure to drill your hole in the center of the bolt and that your drill is in reverse.
How do you use the clutch when driving screws?
As was mentioned before, the drill driver can be used to drive and remove screws. The torque of the drill is the “rotational force” or “twisting ability.” Sometimes, the full torque that the drill driver is capable of generating is not needed for driving a screw. That can be the case when the screw is short or it’s going into softwood. In that case, you might want to reduce the torque to avoid damaging the screw or workpiece. This can be done by adjusting the clutch on a drill driver.
You can adjust the clutch by moving a collar near the chuck. The collar will typically have numbers on it that range from 1 to 10 or more; these numbers represent how much torque will be applied to your screw when you turn on the drill driver. I wrote another article about the drill driver clutch.
When you are driving a screw into a piece of wood, start with the lowest torque setting. If it doesn’t provide enough torque to drive your screw all the way in, increase the torque. Continue this process until you have found a setting that gives you enough torque, yet not so much that you damage the screw or workpiece.

Final words …
There you have it! The reverse control makes the drill driver a more versatile tool, allowing you to perform tasks that might be difficult or impossible with a regular drill. It’s a must-have for any DIYer or woodworker looking to get more out of their tools!
Did you enjoy reading this article? If so, you might want to visit my Pinterest profile. It contains pins about DIY & Crafts, Woodworking, Tools, Projects, Hardware, and similar topics.