How can you make your wood project look better? Is there anything you can do? Well, we have all noticed flaws and realized that we could have taken care of the issue at an earlier time.
Often you don’t see the problem until the final finishing and staining. At that point, all small imperfections are highlighted by the stain. While it is possible to re-sand, it is not often a practical alternative.
As we shall see, there are many things to consider in the early stages of a woodworking project. By just taking care of a few issues, you can make a vast improvement in overall quality. So, your project will sell for a greater price and you’ll receive fair compensation for your hard work:
1. Sanding
You can make the project look better by sanding it. Generally, you want to sand with the grain of the wood in order to avoid putting scratches or other marks on it.
However, you need to need careful with softwoods such as pine. Pieces of sand and other materials can leave marks on the wood surface.
You need to sand out any marks before putting on the wood stain. If this is not done, the stain will make them more visible, and hurt the appearance of the project. It can give the project an amateurish look.
2. Use a Drill
Most of the time, you fasten the wood pieces to each other with nails and screws. You should really drill holes for these items before using them. This helps to make sure that they are put in the proper locations and reduces the marks from hammers: Since the fastener is more stable in a drilled hole, there is less of a tendency for the hammer to slip off the fastener head and mark the wood.
Also, it is a good idea to countersink wood screws. This practice has many advantages and adds to the overall quality of the woodworking project.
Another alternative is a Push Drill. This hand tool drills a small hole in order to help you start a nail or other fastener. It does this by rotating the bit when you push the drill toward the wood. This hand tool is both portable and convenient.
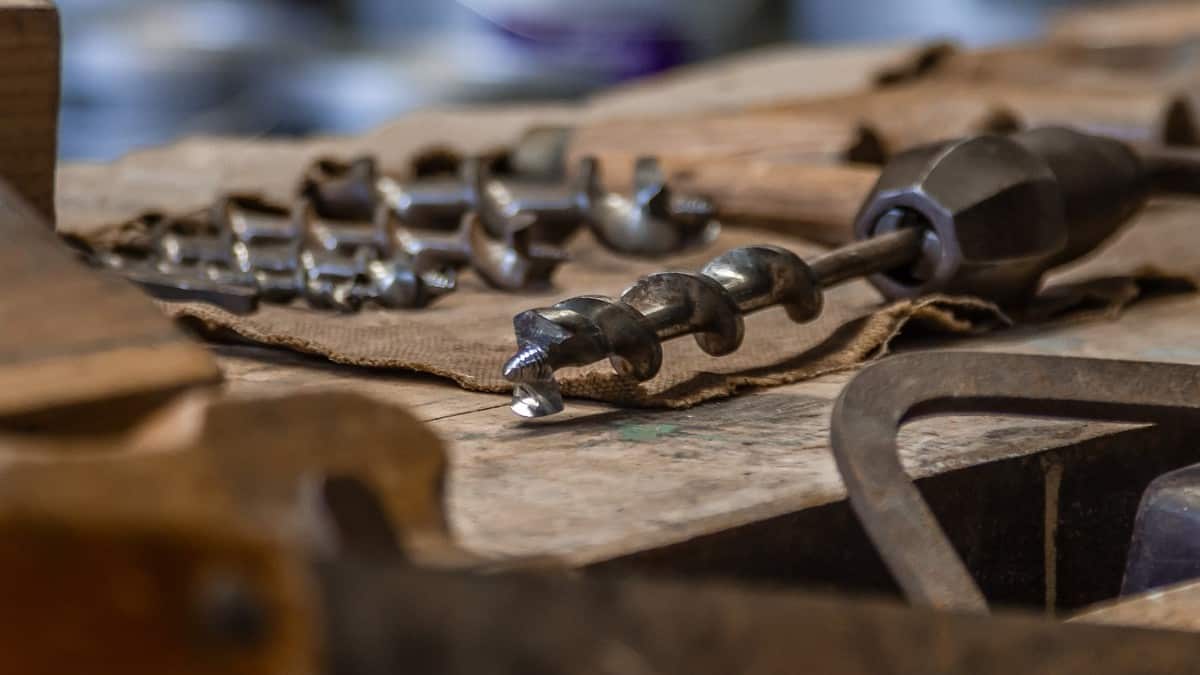
3. Use Brace Hand Tool
Consider using brace and screwdriver bit. I have written before that the hand tool known as a Brace can be used as a screwdriver. In summary, it gives you more control than you would have with an electric drill/screwdriver.

The picture above shows a Screwdriver Bit for a Hand Brace. The top-end has a screwdriver tip. In this case, it is a flat blade. At the bottom is the Tang. The Tang is inserted into the Brace chuck. You then tighten this so that the bit is held tightly.
You can also use the Brace with other bits. When you bore a hole, you need to be careful when the hole is almost done. If you push too hard at that point, you might cause the wood to splinter as the bit breaks through the wood.
4. Tack Cloth
A Tack Cloth is made of a sticky material and is used to pick up sawdust, steel wool particles, or similar materials. There are several things to know:
- Use After Sanding – Make sure to rub the wood with this after you are finished sanding. You will be surprised how much sawdust is still on the wood at that time.
- Use after Steel Wool – After the wood stain is dry, you might apply polyurethane, shellac, or a similar substance. To smooth it after it’s dry, you would rub the surface with steel wool. This process will always leave metal splinters. You need to remove them before putting on the next coat of the polyurethane or shellac. When these substances are mixed with steel wool residue, the results are terrible! While we are on the subject, I should mention that you need to avoid rubbing the steel wool too hard since you can easily start removing the wood stain.
- Compressed Air – You might want to use this in addition to or instead of a Tack Cloth. Use it to remove dust and other particles.
5. Be Careful When Drilling
Measure holes carefully and try to make sure that they are drilled at the proper angles. This is of particular importance when attaching hardware such as hinges, knobs, etc. You don’t want these items to be in the wrong places!
Also, be careful when attaching doors to a cabinet. Make sure they are in the proper position before putting in the screws.
In addition, you want the holes bored by the drill to be as clean as possible. Make sure that the screwdriver does not slip off the head of the screw and mark up the wood. Also, it should be properly seated on the screw. The flat blade or screwdriver tip should not chew up the wood as the screwdriver is turned.
6. End Grain
By End Grain, I am referring to the end parts of the board or cut pieces. These end grain parts will soak up more stain and be darker. So, you should make plans so as to avoid end grain in visible parts of furniture (unless you like that effect and want to make end grains more prominent).
7. Measure Twice – Cut Once
This old adage is certainly true when it comes to woodworking. You must be precise in your measurement, and only make cuts when you are sure that the measurement is correct. Here are some of the times when you need to measure:
- Cutting Out Boards – Once it is cut, the board must be the correct size. You can always make it shorter. However, you may need to adjust the other boards so that your entire project is square and doesn’t look like modern art.
- Building Cabinet – When you build a frame or support structure for a cabinet, it is important to cut pieces to the proper length. If this is not done, you may find it difficult to adjust the other pieces. They may already be glued to each other, or fastened in some way.
- Screws and Nails – These need to be put in the proper places. For example, if you put them too close to the end of the board, it may crack. Also, you don’t want to use more fasteners that you need or waste them. In addition, you can probably see where the screws are, even if they get covered by wooden plugs or dowels. You don’t want them spaced at irregular intervals. That looks messy.

8. Planning
Spend the time to draw up informal plans for the woodworking project and know exactly how much wood the project will take. This is even more important when you will be producing more than one of an item. This approach has several advantages:
- Needed Supplies – You have a better idea of exactly how much wood the project will take. Also, you might waste less hardware, screws, and nails because you know exactly how many to use.
- Weak Spots – When you establish plans, you are in a better position to cut boards so as to avoid weak spots such as knots. Also, you want to keep screw holes from the end of the board or from knots.
- End Grains – As described in Point #6, you would like to keep them in non-visible locations. If your plans call for prominent locations, you can always alter them. It’s always easier to amend plans than to have to re-do your project.
- Time – When you go through the trouble of making a plan, you can get a better idea of the time the project should take. It’s amazing how much time you can waste when you are not sure what you need to do, or what step is coming next.
- Uniformity – A plan helps you to produce the same item over and over again. So, the screw holes are put in the same places, and the items look the same. This adds to the quality of your woodworking projects.
Conclusion
In this article, we discussed several ways to make wood projects look really great. While this was targeted toward the beginner, experienced woodworkers need to make sure that their projects are as good as they can be. By doing this, the projects will sell for more money and all of your work will be worth more.
Did you enjoy this post? If so, you may want to follow my boards on Pinterest.
Did I leave out anything? What are some other ways to improve woodworking projects? Please feel free to leave an addition or comment.

Like!! I blog frequently and I really thank you for your content. The article has truly peaked my interest.