In this article, I will show why it’s important to countersink wood screws. Also, I’ll show what can happen if you don’t countersink.
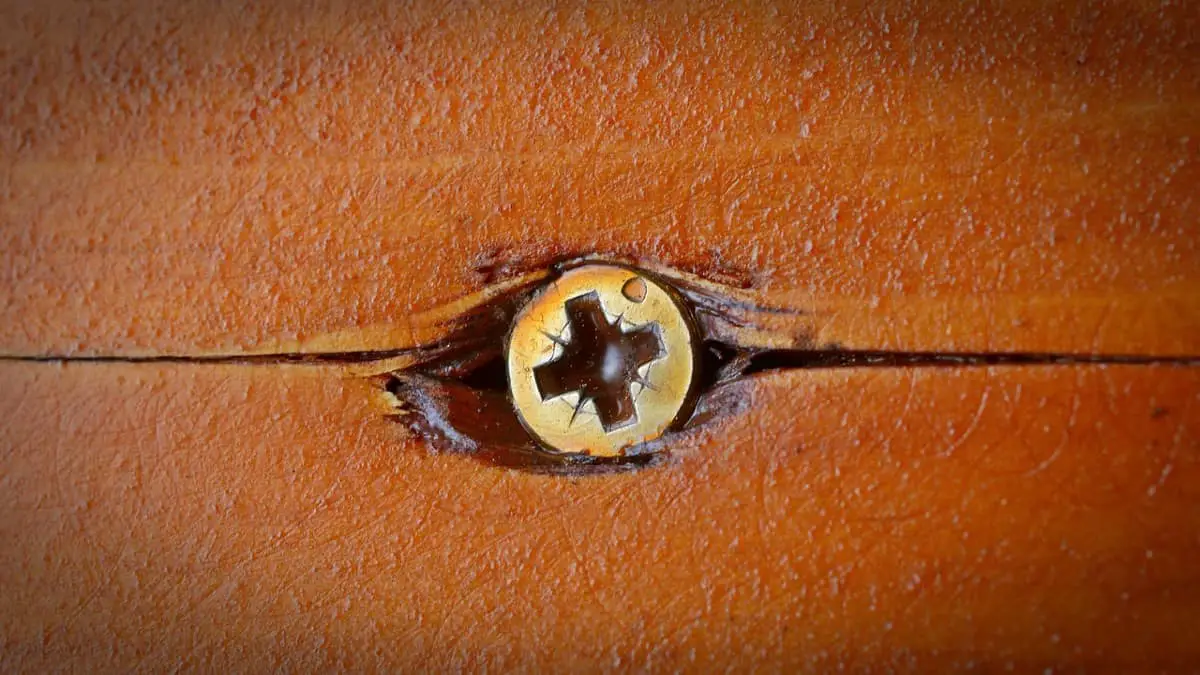
First, what is countersinking? Well, a typical wood screw has a chamfer angle of 82-degrees at the top. By this, I’m referring to the vee at the screw head. This vee will push wood away as the screw is tightened. This can result in many problems, as will be described below.
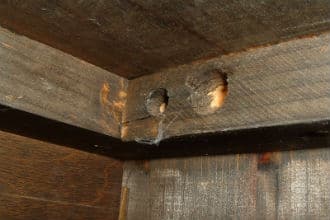
To avoid them, you can drill a countersinking hole for the wood screw. There are a few steps for this: A pilot hole is drilled for the screw. This allows it to travel into the wood more easily. Also, you cut a vee for the head of the screw. In addition, you drill a counterbore so that the screw head can be tightened below the surface of the wood.
Fortunately, these steps can all be done at once with a combination pilot hole and countersinking bit for the drill. Sometimes, this type of bit is just referred to as a countersinking bit. The bottom part of the bit contains a taper and cuts a hole smaller than the diameter of the screw threads. As you travel up, the bit widens so that it can cut the 82-degree chamfer angle section. Finally, the bit reaches a diameter greater than that of the screw head and you can cut the counterbore hole. The counterbore can be 3/8 inch or so, depending on the size of the bit. This allows a wood plug to be inserted over the screw head. Plugs are often used with pieces of furniture.
Reasons Why to Use Countersink
There are many reasons to countersink a screw. Below, we have listed some of them. I’m sure you’ll agree that countersinking is a very good practice. Sure, it takes some extra time. However, you will probably save time in the long run. Also, your project will look better and have a more professional appearance.
1. The Screw is Hard to Turn
The vee section of the wood screw pushes away the wood as it is turned. With a soft wood like Pine, you might be able to tighten the screw so that the head is flush with the surface. However, you risk putting too much stress on the wood and cracking it.
This becomes even more of a problem if the wood is hard, like Oak. The solution is to drill a countersink hole. This hole makes it easier to turn the screw.
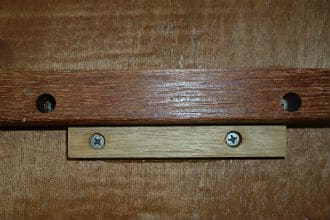
2. Want to Hide Screw
You can cover the screw with a wood plug in order to hide it. The plugs can be held in place with wood glue. However, make sure that you wipe off any excess. A damp cloth can help with this. Also, you might have to wait for the glue to dry and then resand the plug section. This allows you to remove any glue residue still on the wood. It’s important to remove this because the glue may interfere with wood stain.
Another approach is to use a wooden dowel piece for the plug. You should cut it close to the surface of the wood, then sand it to be flush with the surface. A coping saw, hand miter saw, or similar tool with a fine-toothed blade can be used to do this. Also, you will want to glue the dowel as you did with the wood plug.
Wood buttons can also be used to cover the screw. These are similar to wooden plugs. However, buttons are rounded while plugs are sanded flush to the surface of the wood.
3. Do Not Want Protruding Screw Hole
If the screw head cannot be tightened all the way, things can get caught on the piece that’s sticking out. This can even be dangerous and result in injury. So, screw holes like this are certainly not suitable for use with furniture.
4. Want to Avoid Cracking the Wood
You certainly don’t want to crack the piece of wood. This can result in a weak joint. Here are some factors that affect this:
- The screw is near the end of the wood – The end parts of the board are always weak areas. You should avoid putting screws in these areas, if possible. Certainly, you should drill countersink holes, in order to reduce the risk of cracking.
- The screw is hard to turn – In general, this means that the wood is being stressed. A pilot hole with countersinking can help with this. However, you also want to make sure that the screw is not too loose. Sometimes, it’s good to drill with a smaller size countersinking bit when you have softwood. One approach is to try this with scrap wood first and see which size is best.
- You overtighten the screw – This can happen if you have no countersink hole, so the vee section is not cut out. As you tighten the screw, the wood is pushed away. This can place stress on it, resulting in a crack or splitting.
- You have no lubrication – You might want to put soap or similar material on the threads of the screw. This will make it easier to turn it and will reduce the chance of cracking.
5. Want Project to Look Nicer
When you drill a countersink bit, you can bore below the surface of the wood and finish with a plug or dowel. These can be sanded flush to the surface of the wood. As a result, the screw is hidden and the project is more attractive.
6. Want to Avoid Gouging Wood
If you attempt to tighten a screw without a countersink hole, you risk cracking the wood. Also, the wood near the screw will probably have a very rough surface. This can be caused by the screw head itself, pushing against the wood.
If the screw is hard to turn, the screwdriver bit might slip off the head of the screw. Since you are pushing the drill downward, the bit can gouge the surface of the wood or chew up the screw head.
7. Want to Help Position Screw
If you attempt to turn the screw without a pilot hole, it will probably end up crooked. That is, it will not be 90 degrees to the wood surface. This can cause all sorts of problems. For one, the pieces might not get aligned properly. Also, the screw might end up closer to the edge of wood than you had planned. This can increase the risk of cracking the wood. By drilling a countersink hole, you can assure that the screw will be where you want it to be. It’s important to have control over the screw position.
Conclusion
In this article, we showed reasons why you should drill pilot holes with countersinking for wood screws. We showed that a countersinking bit should be used. Also, this will let you counterbore the screw below the surface of the wood. When you do this, you can hide the screw with a wood plug, dowel, or button.
Did you enjoy this article? If so, you might be interested in my boards on Pinterest.
Please feel free to comment on this material. Are there any other factors to consider? Do you have anything to add?
