
This article shows you how to fix sanding mistakes. We all sand improperly when working on projects. The idea is to fix mistakes and recover from the problem so that it does not ruin the project.
To quote Sigmund Freud, “There are no mistakes”. He was talking about the mind. However, we’re talking about woodworking here. Yes, there ARE mistakes when sanding. We need to find out how to fix them.
Enough with this diversion. Let’s get to the matter at hand:
Imperfections On Wood
Sometimes, you want a “rustic” or “weathered” look in your project and would like imperfections.
Barn board is an example of wood like that. It comes from old barns and is a type of reclaimed wood (I have written an article about reclaimed wood here).
In fact, you might add extra marks, called “distress marks”, to wood. The idea is to make the wood look older than it actually is.
Most of the time, you want to remove imperfections from your project. You do this by sanding the wood.
This is even more of a concern if you plan to finish the project with wood stain. It “brings out” imperfections or scratch marks, even if you cannot see them on the unstained wood.
Normally, you remove marks by starting with coarse grit. Sand with this to remove all imperfections. However, this will leave scratches on the surface of the wood.
Then, you move to less coarse sandpaper. These are the ones with a higher grit number. Re-sand the wood until the scratches are gone.
Repeat this process until you end up at Fine grit (#180 or so). This prepares the wood for staining and finishing.

Sandpaper Grits
| Type | Grit | Comment |
| Coarse | 40, 50, or 60 | Removes wood rapidly |
| Medium | 80 | Prepares wood for Fine sandpaper |
| Fine | 100, 120, or Higher | Prepares the wood for stain or finish |
Sanding takes a long time. There is a temptation to shorten the process by skipping grits and going down to Fine before removing all marks. However, this is usually a mistake.
This is because it is “close to impossible” to remove marks caused by a coarser grade when using finer sandpaper.
You might not see the marks right away. However, they will be visible when you finish with the wood stain.
To fix this, you need to move to a coarser grit, sand out the marks, and move down to the finer grit.
How To Fix Sanding Mistakes: Not Sanding With The Grain
The grain is made of wood fibers. Often people sand across them. This cuts them and leaves marks on the wood. This is referred to as “Sanding across the grain”.
Sometimes, this is unintentional. You can be sanding one piece of wood with the grain. However, the edge of the sandpaper can rub against crosspieces in your project. Some of these have grains 90 degrees from the grain you are working with. So, you can end up scratching the crosspieces.
Actually, it’s easy for this sort of thing to happen.
So, let’s say you have scratched pieces of wood by sanding across the grain. Is it too late?
Actually, you might be able to recover from this situation: Move to the coarser grit and sand out the marks, Then you can progress to the less coarse grit. In every case, you do not proceed until you have removed all marks.
Another alternative is to plane the wood with a surfacing machine. However, you will make the wood thinner. Also, you can leave milling marks on the wood. You will need to sand these out.
Oversanding The Wood
You have gone down to #180 grit and plan to stain the wood project. Doesn’t it make sense to use finer grits and make the wood even smoother? Wouldn’t this result in a better finish?
Some people do go down to #220 or so. However, you need to realize that the more you sand the wood, the less it brings out the stain pigment. So, you reach a point where the wood is smoother. However, the stain does not color the wood as much. You can see what I am talking about by looking at the picture below:
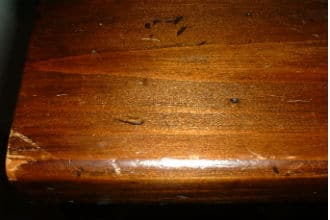
You can fix this problem by returning to #180 or so grit and resanding. This should really be enough.
How To Fix Sanding Mistakes: Don’t Gouge The Wood
A gouge in the wood is a depression or indentation on the surface.
When you sand by hand, you can sand unevenly. There is a tendency to apply too much force under your hand.
If you make this mistake, you need to return to a coarser grit. Then re-sand and remove the depression.
You can often avoid this situation by using a sanding block. This can be a piece of scrap wood or a pad with a flat surface. It applies pressure to the wood more evenly.
Belt Sanders often cause gouges. Also, you need to keep the Belt Sander under your control at all times. In addition, you need to avoid pressing down on it, even if you need to remove some rough surfaces and take off a lot of material.
Sometimes, you can fix gouges by planing the wood so as to even the surface.
Also, you can put the wood through a wood surfacer. However, this might introduce milling marks and you would have to sand those out. In addition, you might take off too much wood and make the board “too thin” for your project (For more information, see another article I have written about sanding).
Electric Sander Leaves Marks On Wood
Let’s face it: Sanding is drudgery and no one likes to do it. Electric sanders make this chore easier and also faster. However, they can leave marks on the wood. Even if you can’t see them, you need to remove them. This is because wood stain will bring out these marks and make them quite visible on your finished project.
So what are the different types of Sanders?
- Belt Sander – Removes wood quickly. Not for the final steps of sanding.
- Orbital Sander – Sometimes, this leaves a round mark on the wood. You can fix this situation by moving to a more coarse grit and sanding it out.
- Random Orbital Sander – This is similar to the Orbital Sander. The pad moves in “random orbits”. So, there is no distinct scratch pattern on the wood. However, it can still leave marks. To remove them, switch to a more coarse grit and sand them out. Then return to the finer grit.
- Straight Line Sander – With this type of sander, the pad moves back and forth. You can orient the sander so that that the pad moves along the grain of the wood. However, this does not eliminate all problems. First, it does not remove as much wood as the Random Orbital Sander, so the process takes a longer time. Also, it can still leave marks on the wood.
Aren’t Pigtails Cute?
So you spent a long time working on your project. You’ve measured the pieces very carefully and have taken no shortcuts. You’ve started sanding with the coarse grits and moved to the finer grits. Finally, you have spent a considerable amount of time sanding your project by hand. You ask: “What will the project look like when it’s stained?”
So, the big day has arrived: You’re ready to stain your project.
You start putting the stain on the wood. Then, you notice round oval marks, on the wood. These marks resemble “pigtails”.
After your initial horror, you try to fix the problem. How do you do this? Is it too late?
Not really. However, it will take a lot of work to fix this. You will need to re-sand so as to remove the stain and arks. I am linking to a good video by Peter Dettorre. This describes the problems with electric sanders and the marks they leave.
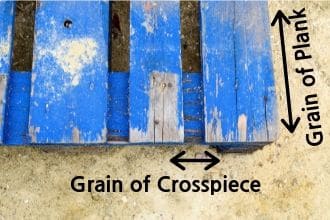
How To Fix Sanding Mistakes: Marks When Vibrating Pad “Bangs” Into A Crosspiece.
Modern electric sanders certainly make sanding easier and can save time.
However, there is a problem that you need to be aware of. The sander pad vibrates quickly. You cannot see that it is moving back and forth.

Because of this, the sander pad can bang into a cross piece without you being aware that you are touching it.
For example, this can happen when you approach the end of a shelf. If the sander “bangs” into the crosspiece at the end, it will leave marks.
To fix this mistake, sand off the marks. Sand along the grain of the crosspiece, not the grain of the shelf.
This can be hard to do if the project has already been assembled and there is not enough room to do the sanding.
Because of this, it might be good to finish sanding before assembling the project, if possible.
Concave Surface Not Adequately Sanded
Many pieces of wood that you will work with have a concave surface (The surface curves inward). An example would be coved molding.
If you attempt to sand a surface like this with a sanding block, you will remove wood from the outer surfaces and miss the inner part of the curve.
Because of this, you will not remove marks from the inner surface, and the result will be uneven.
If you stain the piece, the inner part will absorb more of the stain than the outer sanded surfaces. This will make the staining job look uneven.
You can fix this mistake by sanding the concave surface with a “round sanding block”. You can make this by wrapping a piece of sandpaper around a wooden dowel or similar object.
For best results, you should choose the dowel so that the curve matches the curve of the concave surface.
If you do not have an exact match for the radius of curvature, you can still use this technique.
Sawdust Is Not Your Friend
You will generate loads of sawdust when sanding the pieces of your project. Many sanders have sawdust collection bags. However, sawdust will always end up all over your project.
Remove the sawdust every time you move from one sanding grit to another. Otherwise, you will leave marks as the particles from coarser grit grind into the wood. You can do this by vacuuming off the wood or blasting it with compressed air. Then, you can wipe the wood off with a liquid such as water.
Another option is to use a tack cloth. This is a sticky cloth used for wood finishing. It can be used to pick up old sawdust and related material.
So, the mistake is to proceed from one grit to another without removing the sawdust. If you do this, you may need to resand with the more coarse grit and then remove the sawdust.
Also, it’s not healthy to breathe in the sawdust, so it’s always a good idea to wear a dust mask or similar when sanding (source).
How To Fix Sanding Mistakes Conclusion
This article discussed several common sanding mistakes and showed how to fix them. It showed how to remove marks on wood, and discussed the reasons for sanding in the first place.
It discussed several power electric sanders. While you can save considerable time with them, it is also possible to make many sanding mistakes. The article shows how to fix these situations.
Finally, it shows that you need to remove the sawdust from the wood before changing grits. You can leave marks on the wood if this is not done.
Did you like this post? If so, please share. Also, follow my boards on Pinterest.

Like!! Great article post.Really thank you! Really Cool.
wow brilliant superior article, answered every question I was asking and other questions I hadn’t even thought of!!