
When you’re a woodworker, you often need to cut curves. It’s one of the hardest tasks to accomplish in terms of woodworking. Whether it’s for indoor furniture or a shelf in the garage, cutting curves is tricky. Woodwork is like a puzzle, and every piece has its own set of curves that fit perfectly with others. A common question among woodworkers is how to cut tough curves; whether it’s for day-to-day projects or for the next masterpiece.
A common belief among woodworkers is that you need to use a jigsaw to cut curves. But is it true? Are there any other tools you can use? Let’s answer this question:
Do I Need To Use A Jigsaw To Cut Curves? No. There are other tools that you can use to help make those cuts. They include the bandsaw, router, scroll saw, keyhole saw, and coping saw (to name only a few). The choice of tool depends on the design of the piece being cut and the final use of the finished product. Each type of saw has pluses and minuses that may make it a better or worse choice for a given project.
When you’re working with wood, you have to know how to use the right tool for the job. Just like when building a house, you don’t use a hammer when you need a drill. Let’s go into more detail and start by looking at the basics of cutting curves with a jigsaw:
How do you cut curves with a jigsaw?
The jigsaw is a versatile and flexible tool. You can use it to cut curves, straight lines, and even circles. An advantage to the jigsaw is that it allows you to work with a range of materials such as hardwood, plywood, MDF, and softwood. Moreover, you don’t need any prior experience to use this tool. Here are steps to follow when cutting curves with a jigsaw:
Step 1: Selecting the Blade – You should choose the blade carefully. This is because the blade type you select will determine the quality of the curve. If you want to cut precise curves, then you should use fine blades with small teeth. When cutting large curves, use coarse blades with fewer teeth.
Step 2: Setting up Your Jigsaw – Next, you should clean your workspace, clamp down your workpiece firmly on your workbench and plug in your jigsaw. You can also use a vise during your project if you don’t have a clamp at hand.
Once you’ve set up all these tools and prepared for the task ahead, put on safety glasses and a dust mask before starting your project.
Step 3: Cutting Curves Using a Jigsaw – Start by marking out your curve on the wood using a pencil and ruler. If you want to make sure that your line is completely accurate, it may be worth using a French curve (These are rulers with different shaped ends that can help you draw perfect curved lines). Then, simply follow your pencil line with the saw and let it do its job.
For many people, the jigsaw is their first introduction to power tools. These hand-held saws are relatively inexpensive, available with a variety of blade types (from fine-toothed blades to those with extremely coarse teeth), and capable of cutting shapes that would be nearly impossible with other types of saws. I wrote another article with 31 helpful tips for using a jigsaw.
How do you cut curves without a jigsaw?
If you don’t have a jigsaw available, it’s possible to do this job without one. The choice of tool depends on how intricate your curve is and how much precision it requires. The more complex your curve is and the more exacting its specifications, the more specialized your tool needs to be. Here are some of the tools you can use:
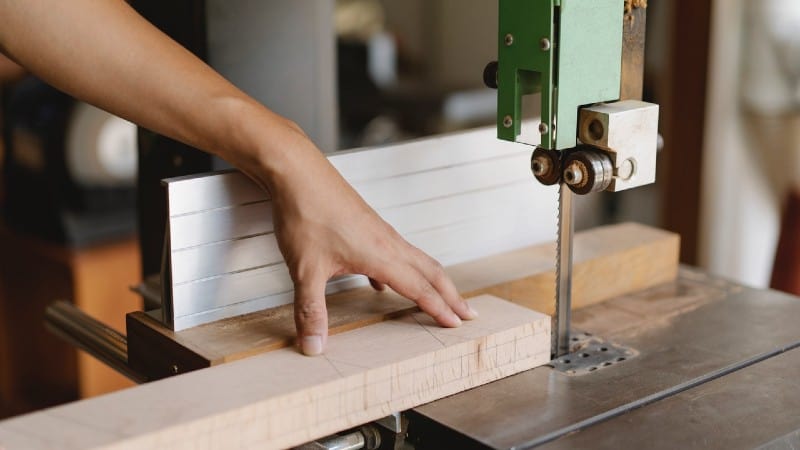
Bandsaw – The blade for the bandsaw is one continuous band that moves downward and cuts the wood. It can be used for ripping material (cutting along the grain). However, it can also be used for cutting curves. The bandsaw can cut thicker pieces of wood than a jigsaw.
There are two popular methods for cutting curves with a bandsaw: follow a pattern by tracing it onto the workpiece, or create an accurate template out of material like MDF, plywood, or cardboard.
When using a power saw of any kind, you need to make sure to wear a dust mask, safety glasses, and hearing protection!
Here are tips for cutting curves with a bandsaw:
1. Pick the right blade
2. Make sure your blade is sharp
3. Take your time
4. Use a smooth motion while cutting
5. Sand or plane the edge if needed
Scrollsaw – The scrollsaw is similar to a jigsaw in that the blade moves up and down. The scroll saw blade is usually more narrow than a jigsaw blade, so it is better for making sharper cuts without breaking the blade. In summary, the scrollsaw is good for making intricate curves.
When using a scrollsaw, it is important that you wear proper safety gear such as safety glasses and gloves. Depending on the type of project you are working on, you may also want to wear hearing protection to protect your ears from the loud noise that can be produced by these machines.
Woodworking router – The router has a motor that rotates at high speed and a bit that extends down from the tool. This bit can be used to cut holes and grooves into the interior of a wooden workpiece. You can choose different bits to cut different kinds of grooves or holes.
Follow these steps to cut a curved shape into wood using a router:
1. Draw your shape onto the wooden workpiece, making sure to mark where you want the router bit to enter and exit the workpiece.
2. Clamp the workpiece in a vice or onto a table so that it is secure while you are working on it.
3. Place your router bit in the router, then carefully set the router on top of the workpiece so that it is positioned over where you want to begin cutting. Turn on the router and guide it along your curved design until you have finished cutting all the way through your workpiece.
4. If necessary, sand down any edges along your curved design that are too sharp or bumpy.
An electric drill – If you need to cut intricate curves into wood, you don’t have to use a jigsaw. Instead, use a rotary rasp with an electric drill. Rotary rasps are drill bits that allow you to cut curves into the wood. They come in different sizes and shapes, but they’re easy to use: just attach one of these bits to a handheld electric drill and start cutting! I wrote another article about drill accessories.
Cutting curves in wood by hand
For this section, I will discount the use of power equipment: they make curved cuts a breeze but are not always practical.
There are many ways to cut curves in wood using hand tools. Here are some of the most common ones:
Coping saw – If you’re looking for a saw to cut curves in wood, look no further than the coping saw. It’s been used for decades, and it’s an easy-to-find, inexpensive choice for beginners and experts alike. It has a strong handle so that you can saw through the wood with ease.
Fret saw – Fret saws are pretty unique in their design. They’re similar to coping saws, but they allow you to make tighter cuts and more intricate patterns. Fret saws are primarily used to cut very delicate or intricate curves, often for decorative purposes.
Keyhole saw – You can cut curves with a keyhole saw. To do this, drill a small hole in the wood at the start of the curve. Then place the tip of the blade of your keyhole saw into the hole and begin cutting along the line of your curve.
Rasp and file – These coarse hand tools are great for removing waste material on the inside of curved cuts made with a coping saw or fret saw and also can be used to cut curved shapes when starting with wood stock.
Whittling knife – A hand woodworking tool such as a whittling knife does not contain any moving parts so its ability to make curved cuts is limited by the fact that it can only be manually controlled by the user’s hands. Although it is possible for these hand tools to make curved cuts with some practice, they will still not produce as clean a cut as an electric jigsaw.
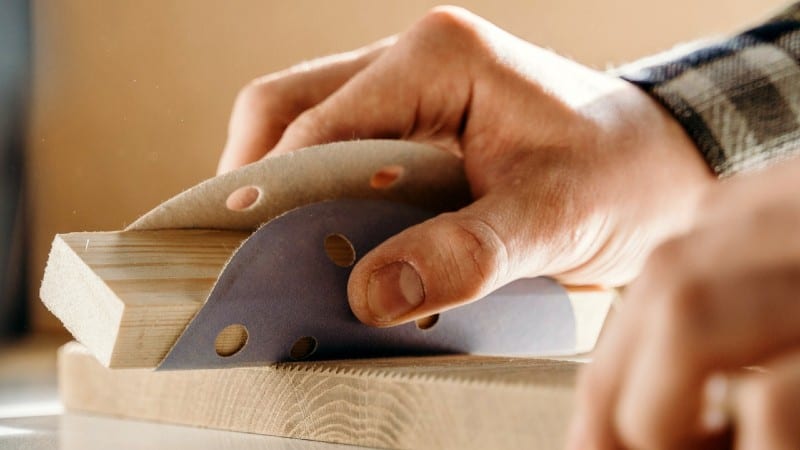
Sanding block – To create smooth, rounded curves in your woodworking project, begin by drawing the curve that you need onto your piece of wood using a pencil. Use sandpaper wrapped around an appropriately shaped block of wood to sand away the excess wood within your pencil line until you have achieved the desired shape. Use progressively finer grades of sandpaper to smooth and refine the surface of your finished curve.
Want to sand wood without sandpaper? See another article I wrote.
Final words: Do I Need To Use A Jigsaw To Cut Curves
The jigsaw will likely remain the primary choice for cutting curves. It’s the most versatile and user-friendly, it’s easy to buy blades for, it works acceptably in most conditions, and it handles curves well. That said, there’s no reason you need to reach for a jigsaw for every curve you make. For more information, see another article I wrote called: What is a Jigsaw?
Have a few different options on hand—jigsaws, coping saws, fret saws—so you can use the right tool where it matters. With the right set of tools at your disposal, cutting curves won’t feel like such a chore anymore.
Did you enjoy reading this article? If so, you might like to visit my Pinterest profile. It contains pins about Woodworking, Projects, Tools, DIY & Crafts, Hardware, and many more topics!
