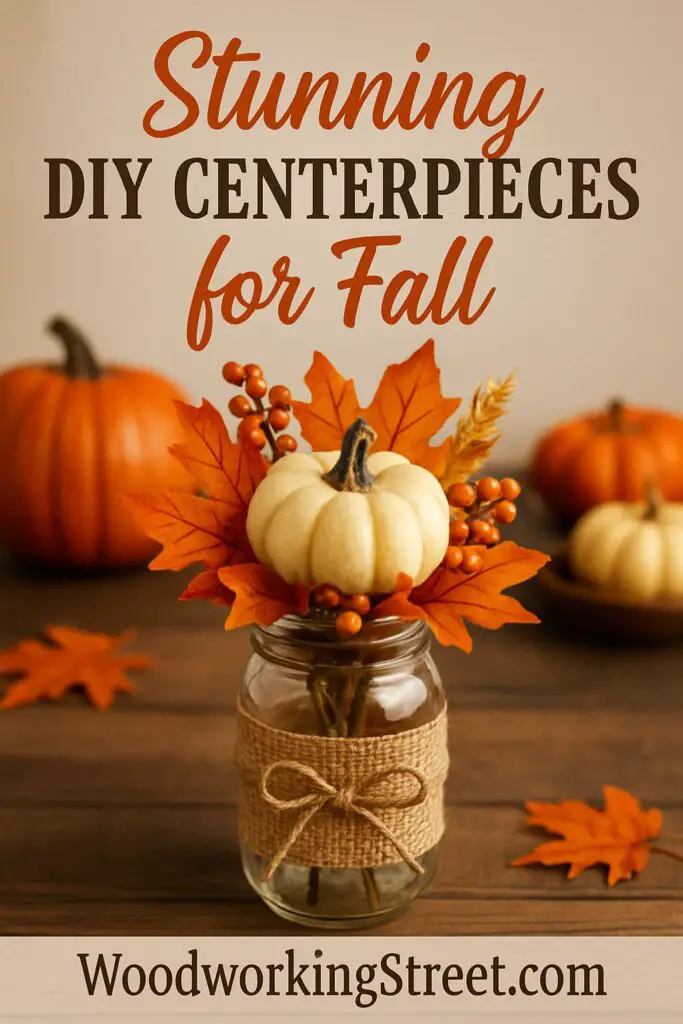
11 Easy Diy Thanksgiving Centerpieces That Look Absolutely Stunning

A beautiful Thanksgiving table is about more than just the food; it’s about creating a warm, inviting atmosphere where memories are made. The centerpiece is the heart of your table decor, and you don’t need to be a professional designer to create something truly stunning. We’ve gathered 11 easy and inspiring DIY centerpiece ideas that will elevate your holiday gathering. From rustic, natural arrangements to charming crafts the kids can help with, these projects are designed to be simple, budget-friendly, and absolutely beautiful.
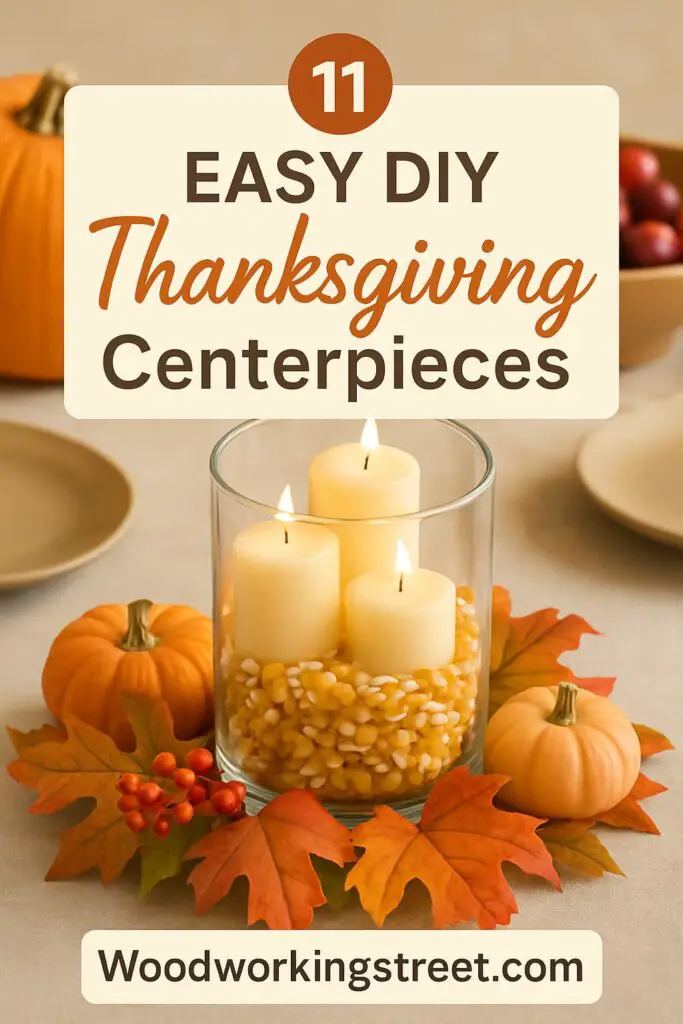
Table of Contents
- Charming Dollar Tree Pumpkin Centerpiece
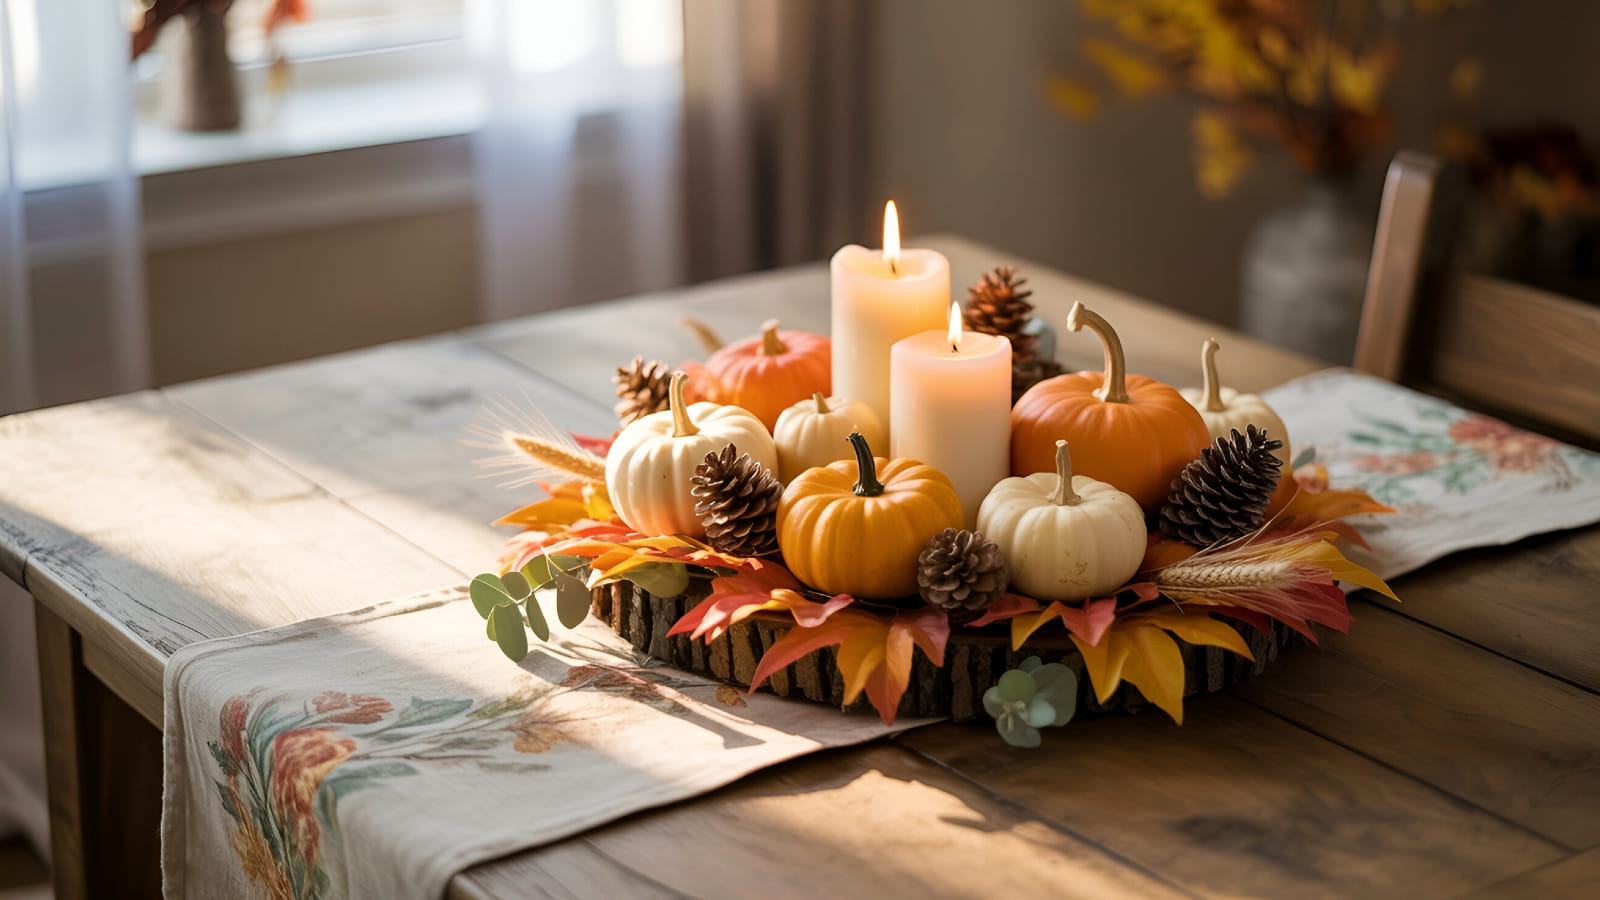
- Rustic Pinecone And Candle Arrangement
- Elegant DIY Fall Floral Display
- Simple Mason Jar And Burlap Creation
- Kid-Friendly Paper Turkey Craft
- Cozy Pumpkin Vase Floral Arrangement
- Inexpensive Fall Garland Table Runner
- Diy Pumpkin Votive Candle Holders
- Harvest-Inspired Cornucopia Display
- Simple Eucalyptus And Gourd Centerpiece
- Friendsgiving-Ready Budget Decor Idea
- Conclusion – DIY Thanksgiving Centerpieces
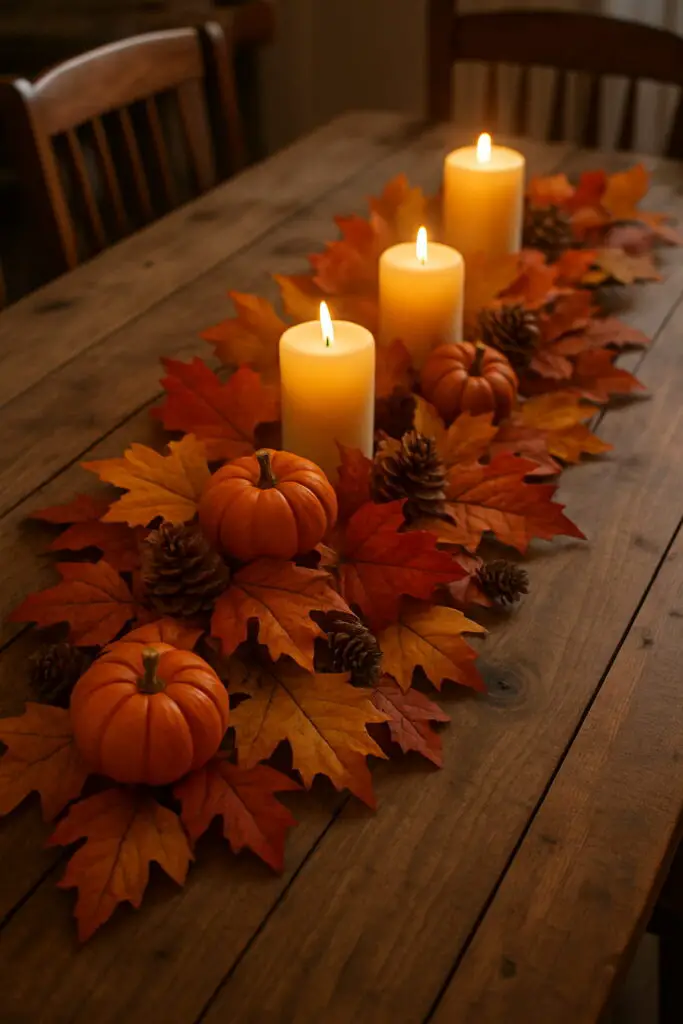
Charming Dollar Tree Pumpkin Centerpiece
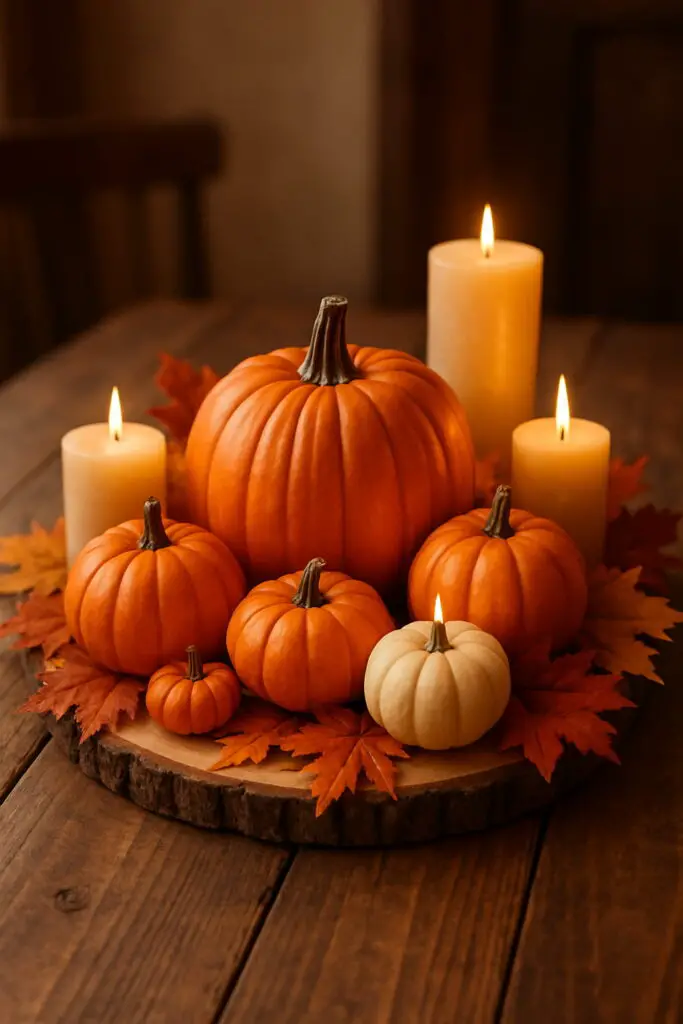
This charming pumpkin centerpiece is a delightful addition to any Thanksgiving table. Using simple items from Dollar Tree, you can create a stunning display that captures the spirit of the season.
The centerpiece features a variety of pumpkins in different sizes, with vibrant orange hues that pop against the warm tones of the wooden table. The larger pumpkins serve as a focal point, while the smaller ones add depth and interest.
To enhance the look, soft candles are placed among the pumpkins, casting a warm glow that invites guests to gather around. The addition of autumn leaves around the base ties everything together, bringing a touch of nature indoors.
This centerpiece is not only easy to assemble but also budget-friendly. It’s a perfect way to showcase your creativity while keeping costs low. Plus, it sets a cozy atmosphere for your Thanksgiving feast.
Creating Your Budget-Friendly Display
- The Foundation: Start with a collection of assorted faux pumpkins from the Dollar Tree. Mixing different sizes and shapes will create more visual interest.
- Add Warmth: Nestle several flameless or traditional candles among the pumpkins. The soft light will create a cozy and inviting glow.
- Finishing Touches: Weave in some faux autumn leaves around the base to tie all the elements together and complete the look.
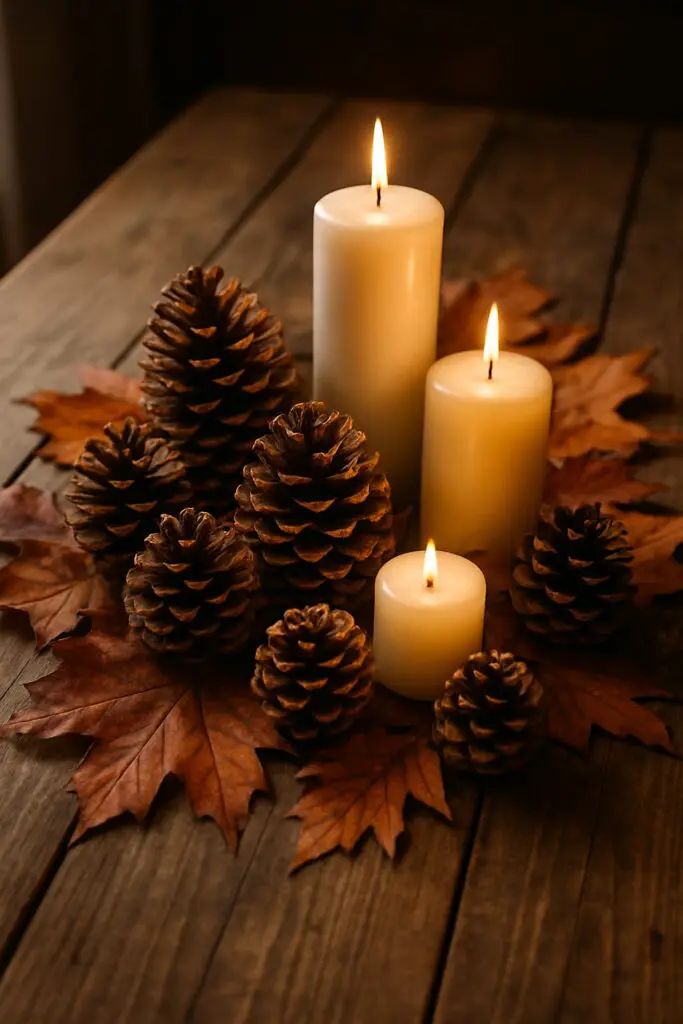
Rustic Pinecone And Candle Arrangement
Note: This post may contain affiliate links. If you purchase a product through an affiliate link, I’ll earn a commission, at no cost to you. To find out more, see my full disclosure.
This rustic pinecone and candle arrangement is a charming centerpiece for your Thanksgiving table. The combination of natural elements and soft candlelight creates a warm and inviting atmosphere. The pinecones, with their rich brown tones, add an earthy touch that perfectly complements the season.
Surrounding the candles are vibrant autumn leaves, enhancing the overall look. The flickering flames of the candles bring a cozy glow, making it ideal for family gatherings. This arrangement is simple to create and can be customized with different sizes of candles or additional decorative elements.
To make this centerpiece, gather some pinecones and a few candles in varying heights. Arrange them on a wooden surface or a decorative tray. Scatter some dried leaves around the base for that extra seasonal flair. This easy DIY project will surely impress your guests and add a lovely touch to your Thanksgiving celebration.
How to Assemble a Natural Centerpiece
- Gather Your Materials: All you need for this simple project are a few pinecones, candles of varying heights, and a handful of real or faux autumn leaves.
- Arrange the Elements: Place your candles in the center of a tray or directly on a table runner. Surround them with the pinecones to build out the arrangement.
- Add a Pop of Color: Scatter colorful autumn leaves around the base of the candles and pinecones for a final, festive touch.
Elegant DIY Fall Floral Display
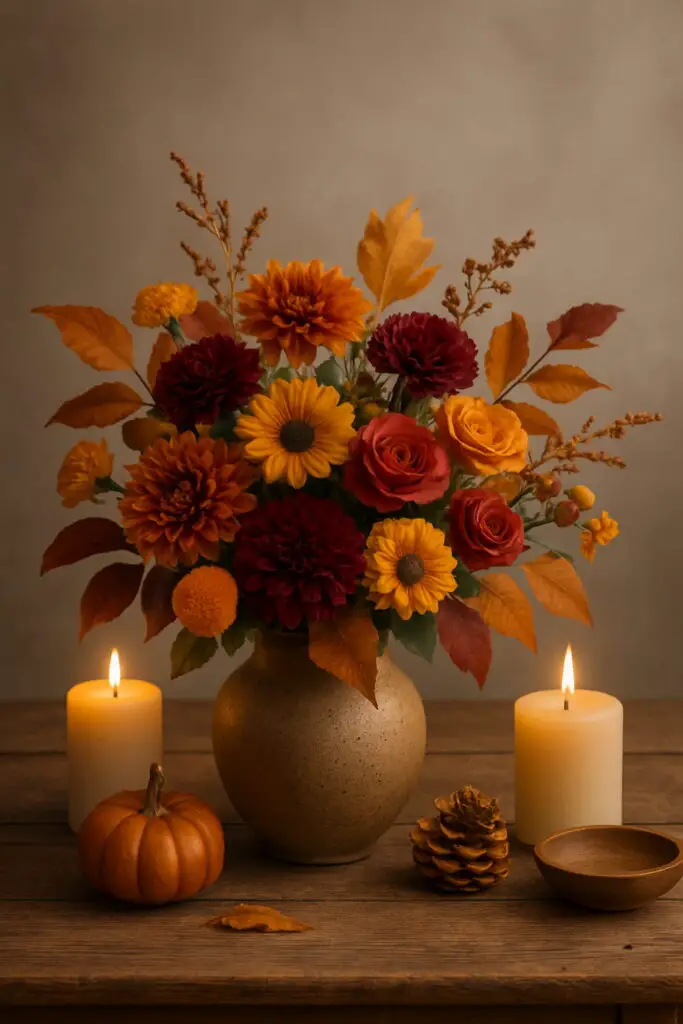
This stunning fall floral display captures the essence of the season. A beautiful arrangement of vibrant flowers in shades of orange, red, and yellow is the centerpiece. The flowers are complemented by warm autumn leaves, creating a cozy feel.
Surrounding the floral arrangement are soft, flickering candles that add a warm glow. A small pumpkin and a pinecone sit nearby, enhancing the autumn vibe. This setup is perfect for Thanksgiving, bringing a touch of nature indoors.
Creating this centerpiece is simple. Start with a neutral vase to let the colors pop. Gather seasonal flowers and foliage, and arrange them with care. Add candles and small decorative items like pumpkins to complete the look. This display not only looks great but also brings a sense of warmth and joy to your holiday table.
Building Your Floral Arrangement
- Choose Your Blooms: Select seasonal flowers in rich autumn colors like deep oranges, burgundies, and yellows. Mums and sunflowers are excellent choices.
- Incorporate Natural Elements: Add texture and a festive feel by placing a small pumpkin and a few pinecones next to your vase.
- Create Ambiance: Place a few soft, flickering candles around the floral display to cast a warm and elegant glow over your table.
Simple Mason Jar And Burlap Creation
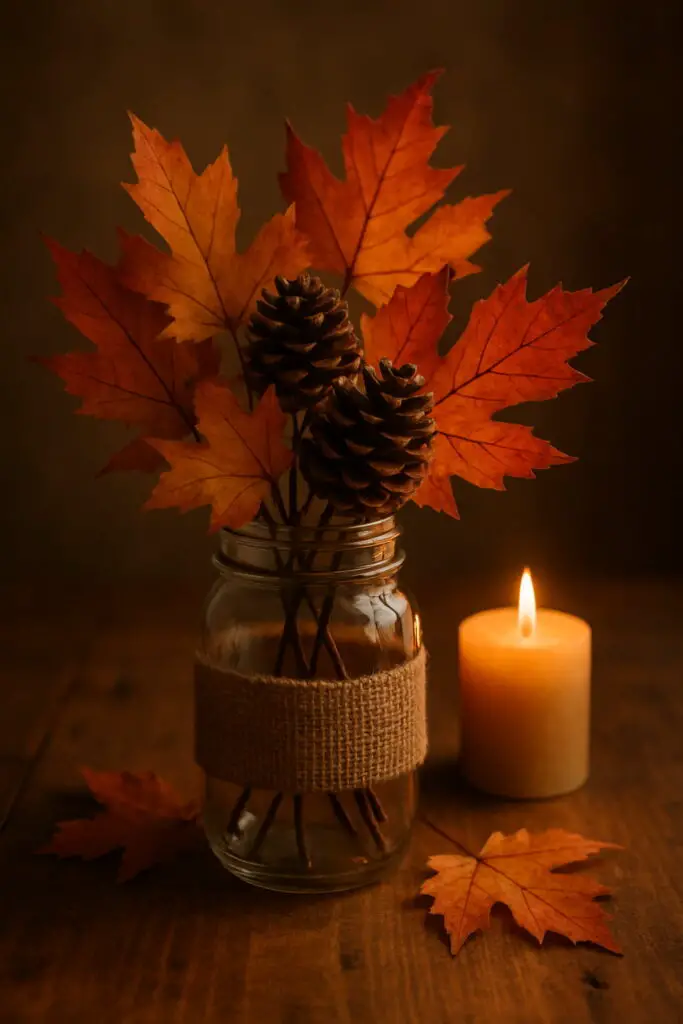
This charming centerpiece combines rustic elements with a cozy vibe, making it perfect for Thanksgiving. The mason jar holds a delightful arrangement of vibrant orange and red maple leaves, complemented by pinecones that add texture and warmth.
The jar is wrapped in burlap, giving it a handmade touch that feels inviting. A softly glowing candle sits beside it, creating a warm atmosphere that enhances the fall theme. Scattered leaves on the table complete the look, bringing nature indoors.
This simple design is easy to replicate. Just gather some leaves and pinecones from your yard or a nearby park, and find a mason jar and some burlap. It’s a fun project that adds a personal touch to your Thanksgiving table.
Crafting a Rustic Accent
- Fill the Jar: Start by filling a standard mason jar with a collection of colorful autumn leaves and a few small pinecones.
- Add a Rustic Wrap: Cut a strip of burlap and wrap it around the middle of the jar, securing it with twine or a hot glue gun for a charming, handmade look.
- Complete the Scene: Place a single, softly glowing candle next to the jar to create a warm and cozy vignette on your table.
Kid-Friendly Paper Turkey Craft

This cheerful paper turkey is a fun and simple craft that kids can enjoy during Thanksgiving. With its bright colors and friendly face, it adds a festive touch to any table setting. The turkey features a brown body with colorful feathers made from construction paper, showcasing shades of red, orange, yellow, and green. The large googly eyes and a little red wattle give it a playful look that kids will love.
Making this turkey is easy and requires just a few materials: construction paper, scissors, glue, and googly eyes. Start by cutting out the turkey’s body and feathers from the paper. Kids can choose their favorite colors for the feathers, allowing for creativity. Once everything is cut out, glue the feathers to the back of the turkey’s body and add the eyes and wattle to complete the look.
This craft not only keeps kids entertained but also makes for a charming centerpiece. Place the finished turkeys on the dining table or around the house to spread some Thanksgiving cheer. It’s a great way to involve children in the holiday preparations and create lasting memories together.
Steps for a Fun Crafting Session
- Gather Your Supplies: You’ll need construction paper in various fall colors, scissors, glue, and a pair of googly eyes.
- Cut the Pieces: Cut out a brown body for the turkey and several feather shapes from the colored paper. Let the kids pick their favorite colors to make each turkey unique.
- Assemble Your Turkey: Glue the colorful feathers in a fan shape onto the back of the turkey’s body, then add the googly eyes and a small red wattle to bring it to life.
Cozy Pumpkin Vase Floral Arrangement
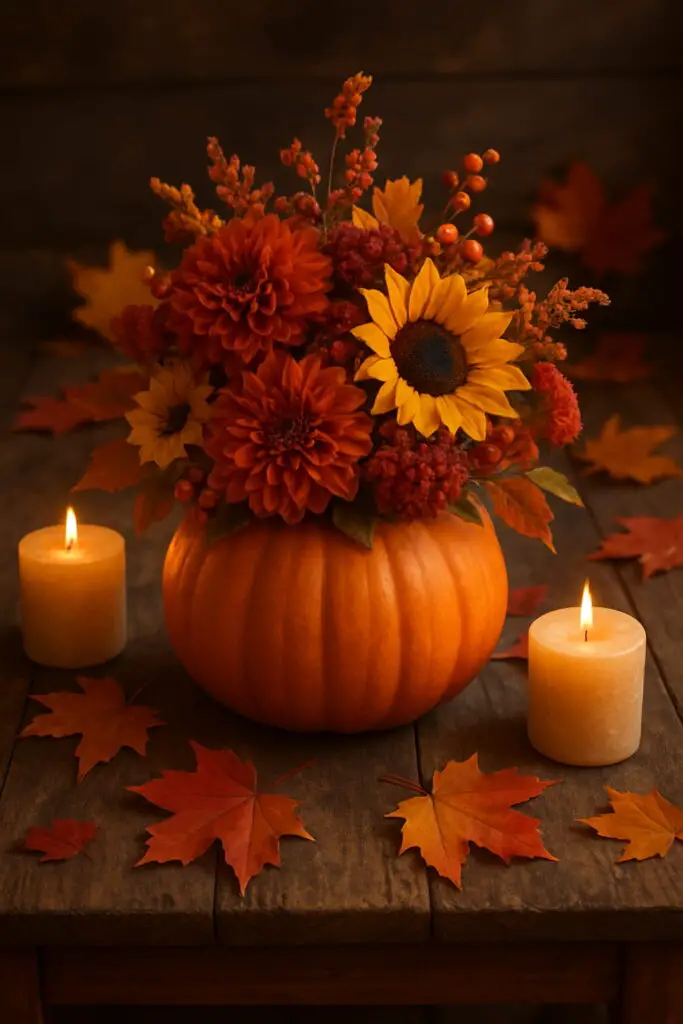
This cozy pumpkin vase floral arrangement is a perfect centerpiece for your Thanksgiving table. The vibrant orange pumpkin serves as a charming base, filled with bright sunflowers and rich dahlias. The colors pop beautifully against the warm tones of autumn leaves scattered around.
Adding candles on either side creates a warm glow, making your dining experience feel extra special. The combination of flowers and pumpkin not only looks great but also brings a touch of nature indoors, enhancing the festive spirit.
To create your own, simply hollow out a pumpkin and fill it with your favorite seasonal flowers. You can mix in some greenery or berries for added texture. This DIY project is simple and will impress your guests!
How to Create Your Pumpkin Vase
- Prepare the Pumpkin: Select a medium-sized pumpkin, cut off the top, and thoroughly scoop out the inside, just as you would for carving.
- Arrange the Flowers: Place a small cup or jar of water inside the pumpkin to hold your flowers. Fill it with vibrant seasonal blooms like sunflowers and dahlias.
- Add Ambiance: For an extra touch of warmth, place a few tall candles on either side of your finished pumpkin vase.
Inexpensive Fall Garland Table Runner
Creating a stunning Thanksgiving centerpiece doesn’t have to break the bank. This fall garland table runner is a perfect example of how simple elements can come together beautifully. The warm hues of orange and yellow leaves, paired with small pumpkins and pinecones, bring a cozy feel to your table.
Start by gathering some faux or real autumn leaves. Lay them out in a line down the center of your table. Add in some mini pumpkins for a pop of color and texture. The pinecones add a rustic touch that complements the leaves perfectly.
To enhance the look, place a few candles among the decorations. The soft glow from the candles will create a warm atmosphere, making your Thanksgiving dinner feel extra special. This easy DIY project is not only budget-friendly but also allows you to personalize your table setting.
Assembling Your Garland
- Create the Base: Lay a line of real or high-quality faux autumn leaves down the center of your table to act as the foundation of your runner.
- Add Dimension: Weave in small pumpkins and gourds throughout the leaves to add pops of color and different shapes.
- Incorporate Texture: Place a few pinecones intermittently along the garland to add a rustic, natural element to the design.
Diy Pumpkin Votive Candle Holders

Creating pumpkin votive candle holders is a fun and simple way to add a festive touch to your Thanksgiving table. The image shows several small pumpkins, each with a candle nestled inside. They glow warmly, surrounded by colorful autumn leaves, setting a cozy scene.
To make these charming holders, start by selecting small pumpkins. Cut off the tops and scoop out the insides. Place a tealight or votive candle in each pumpkin. You can use different pumpkin varieties for added texture and color. Arrange them on your table with some fallen leaves for a beautiful centerpiece.
This DIY project is not only easy but also a great way to involve family and friends. Everyone can personalize their pumpkin, making it a memorable part of your Thanksgiving celebration.
Crafting Your Candle Holders
- Select Your Pumpkins: Choose several mini pumpkins or small gourds that are stable enough to sit flat on the table.
- Carve the Holders: Carefully cut a circle around the stem of each pumpkin and scoop out just enough of the inside to snugly fit a tealight or votive candle.
- Create the Display: Arrange your finished pumpkin candle holders in a group and scatter some colorful autumn leaves around them for a simple yet beautiful centerpiece.
Harvest-Inspired Cornucopia Display
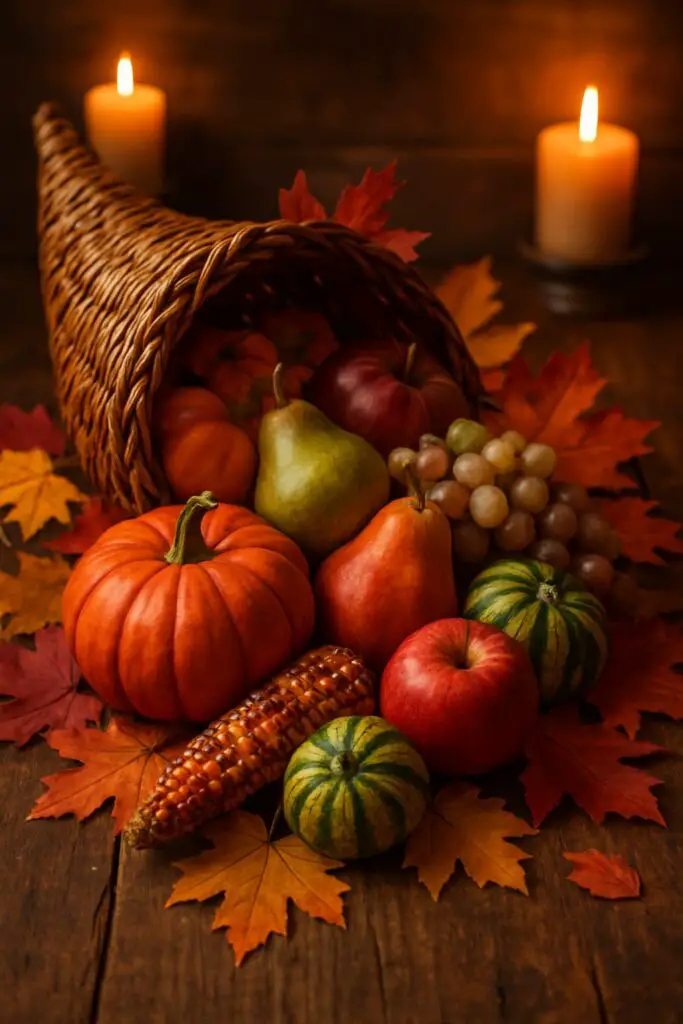
The cornucopia is a classic symbol of abundance, making it a perfect centerpiece for Thanksgiving. This image showcases a beautifully arranged cornucopia overflowing with colorful fruits and vegetables, including pumpkins, pears, and apples. The warm autumn colors of the leaves and the soft glow from the candles add a cozy touch to the display.
Creating your own cornucopia is simple and fun. Start with a woven basket or a horn-shaped container. Fill it with seasonal produce like mini pumpkins, gourds, and fresh fruits. You can even add some faux leaves for extra flair. Arrange everything in a way that looks full and inviting.
This centerpiece not only looks stunning but also serves as a conversation starter at your Thanksgiving table. Guests will appreciate the thoughtfulness behind such a festive display. Plus, it’s a great way to showcase the harvest season and the spirit of gratitude.
How to Fill Your Cornucopia
- Start with a Base: Begin with a woven, horn-shaped basket, which is the traditional cornucopia shape.
- Layer the Contents: Fill the basket so it looks like it’s overflowing with the bounty of the season. Use a mix of mini pumpkins, gourds, apples, pears, and grapes.
- Add Finishing Touches: Weave in some faux autumn leaves or sprigs of wheat to fill any gaps and add extra color and texture to your display.
Simple Eucalyptus And Gourd Centerpiece
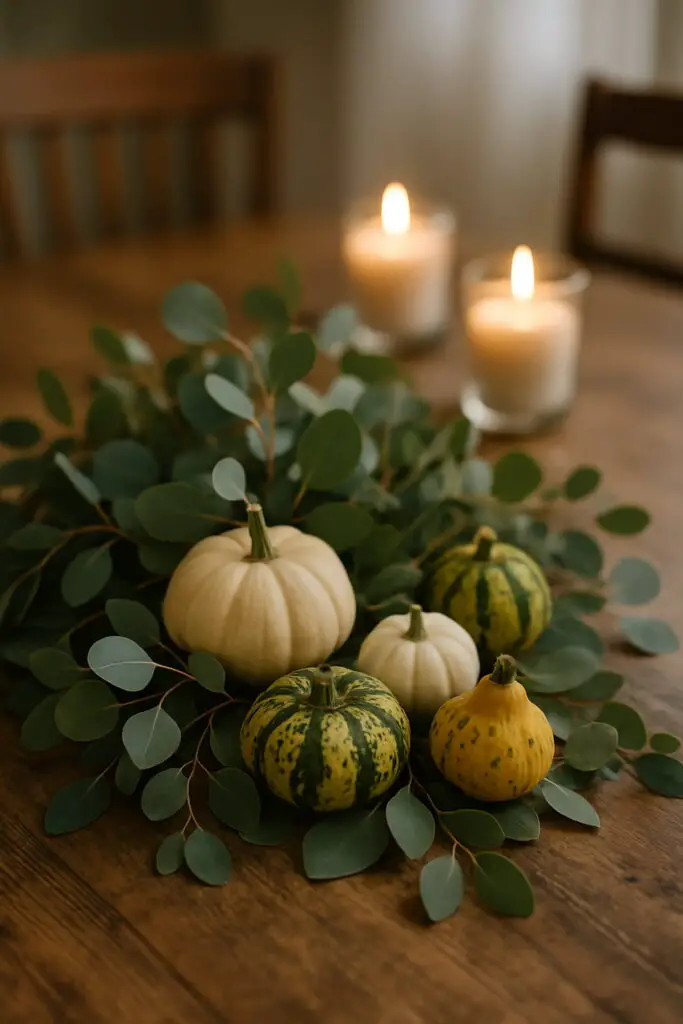
This stunning centerpiece combines the natural beauty of eucalyptus with charming gourds, creating a warm and inviting look for your Thanksgiving table.
The soft green leaves of the eucalyptus provide a lovely contrast to the vibrant colors of the gourds. You can see white, green, and yellow gourds nestled among the foliage, adding a playful touch.
To make this centerpiece, start by gathering fresh eucalyptus and a variety of small gourds. Arrange the eucalyptus in a circular shape on your table, then place the gourds in the center. You can even add a few candles around the arrangement for a cozy glow.
This centerpiece is not only easy to create but also brings a touch of nature indoors, making it perfect for your Thanksgiving celebration.
Creating an Elegant Arrangement
- Form the Foundation: Arrange branches of fresh or faux eucalyptus in a loose circle or runner down the center of your table.
- Nestle in the Gourds: Place a variety of small gourds in different colors (white, green, and yellow work well) amongst the eucalyptus leaves.
- Add a Glow: For a final touch, place a few simple pillar candles around the arrangement to add warm, soft light to your tablescape.
Friendsgiving-Ready Budget Decor Idea
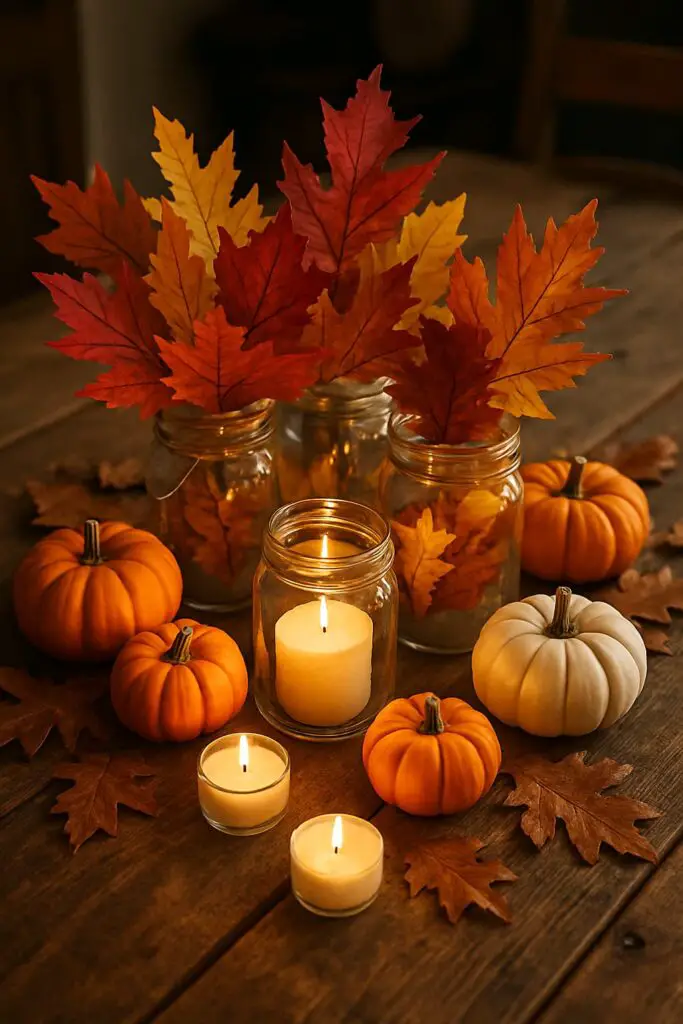
This charming centerpiece is perfect for your Friendsgiving gathering. It brings warmth and a cozy feel to your table without breaking the bank. The mix of vibrant autumn leaves and cute pumpkins creates a festive vibe that everyone will love.
Start with some mason jars filled with colorful leaves. You can easily find these leaves outside or even use faux ones if you prefer. Place a few candles inside the jars to add a soft glow. The flickering light will make your table feel inviting.
Next, scatter some mini pumpkins around the jars. The orange and white pumpkins add a nice contrast and enhance the fall theme. Don’t forget to sprinkle some extra leaves on the table for a complete look. This simple yet stunning arrangement will impress your guests and set the perfect mood for your celebration.
Assembling a Charming Centerpiece
- Start with Jars: Fill a few mason jars with colorful autumn leaves (either real or faux) to create a simple, rustic base.
- Add Light and Color: Place a flameless or traditional candle in empty jars for a soft glow. Scatter a handful of mini pumpkins around the jars on the table.
- Complete the Look: For a final touch, sprinkle a few extra leaves directly on the table to tie the entire arrangement together and create a cohesive look.
Conclusion – DIY Thanksgiving Centerpieces
Creating a beautiful tablescape for Thanksgiving doesn’t have to be complicated or expensive. With a little creativity and a few simple materials, you can craft a stunning centerpiece that reflects the warmth and gratitude of the season. We hope these ideas inspire you to personalize your table and make this year’s gathering extra special.
For more holiday decor and entertaining inspiration, be sure to visit my Pinterest profile at: https://www.pinterest.com/woodworkingstreet/